- What is Control Valve Preventive Maintenance?
- Why is Control Valve Preventive Maintenance Important?
- What are the benefits of preventive maintenance?
- Step by Step Control Valve Preventive Maintenance Procedure
- Inspection of control valve actuator
- Inspection of control valve Positioner
- Inspection of control valve Stem Connector
- Inspection of control valve Feedback Link
- Inspection of control valve gland packing assembly
- Inspection of control valve bonnet assembly
- Inspection of control valve body stem
- Inspection of control valve body seat and trim assembly
- Checking the functionality of the control valve
- How is control Valve calibrated?
- Calibration of control valve positioner
- Control Valve Accessories
- Inspection and function check
- Documentation:
- Completion of PM maintenance
- Preventive maintenance checklist – Download
- Control Valve Preventive Maintenance Checklist
- Control Valve Maintenance Frequency Table
- Common Control Valve Problems and Troubleshooting
- Symptoms of a Failing Control Valve
- FAQ on Control Valve Preventive Maintenance
Control valve preventive maintenance is essential in process industries to ensure stable process control, reduce unplanned shutdowns, improve valve reliability, and extend equipment life. A poorly maintained control valve can lead to valve hunting, leakage, inaccurate flow control, excessive actuator wear, and process instability.
This guide explains the complete control valve preventive maintenance procedure including actuator inspection, positioner checks, gland packing inspection, trim inspection, leak testing, troubleshooting, calibration verification, and maintenance checklist activities used in process plants.
What is Control Valve Preventive Maintenance?
- Control Valve Preventive Maintenance is the planned and organized work that is done on control valves to prevent problems and make sure they work well and are reliable.
- It involves doing a series of tasks at regular intervals to keep control valves in good condition and make sure they work as well as possible.
Why is Control Valve Preventive Maintenance Important?
Routine preventive maintenance of control valves helps to:
- Prevent unexpected valve failures
- Reduce production downtime
- Improve process stability
- Minimize air leakage and seat leakage
- Extend actuator and trim life
- Improve control accuracy
- Reduce valve stiction and hunting
- Ensure fail safe operation during emergencies
- Maintain accurate valve positioning
What are the benefits of preventive maintenance?
- Regular inspections and checks are conducted to identify any signs of wear, corrosion, leakage, or other problems in control valves.
- By detecting these issues early on, appropriate actions can be taken to prevent major failures or performance degradation.
- Control valves have moving parts that require proper lubrication to reduce friction and ensure smooth operation.
- Lubricants are applied to the stem, bearings, packing, and other critical areas to minimize wear and extend the lifespan of these components.
- Control valves need to accurately respond to control signals and regulate fluid flow or process parameters.
- Preventive maintenance involves calibration and adjustment of control valves to ensure their positioning accuracy, stroke, and response time are within specified limits.
- This helps maintain precise control and optimize process performance.
- Control valves can accumulate debris, sediment, or other contaminants over time, which can affect their performance.
- Preventive maintenance includes cleaning internal parts, such as valve seats and discs, to remove any buildup. Additionally, visual inspections are conducted to identify and address any physical damage or abnormalities.
Step by Step Control Valve Preventive Maintenance Procedure
Safety Precautions Before Control Valve Maintenance
Ask the person in charge of the control panel to set the maintenance override switch (MOS) for the Control Valve in the ESD loop and the manual mode (Control Valve in the control loop) on the controllers.
- Before starting any PM tasks in the Control Valve, you must set up both of the above configurations at the same time.
- Find the Control Valve in the process area that is listed under “Preventive Maintenance.“
- Make sure the Control Valve is the same and double-check any important information, like the Tag number.
- Prior to performing any maintenance activities, ensure that the control valve and connected systems are properly depressurized and relieved of any stored energy.
- This will prevent sudden releases of pressure or fluid when the valve is opened.
- Before performing any maintenance tasks on control valves, it is crucial to follow proper lockout/tagout procedures.
- When working on control valves, regularly put on the proper personal protection equipment, such as safety goggles, gloves, and coveralls.
- Depending on the maintenance task and the surrounding environment, different PPE may be needed.
- Follow the guidelines and instructions for maintenance provided by the manufacturer for the particular control valve being serviced.
- Make sure you are using the appropriate tools and equipment for the current maintenance activities.
- Make that the control valve where the PM work is to be done has a valid work permit.
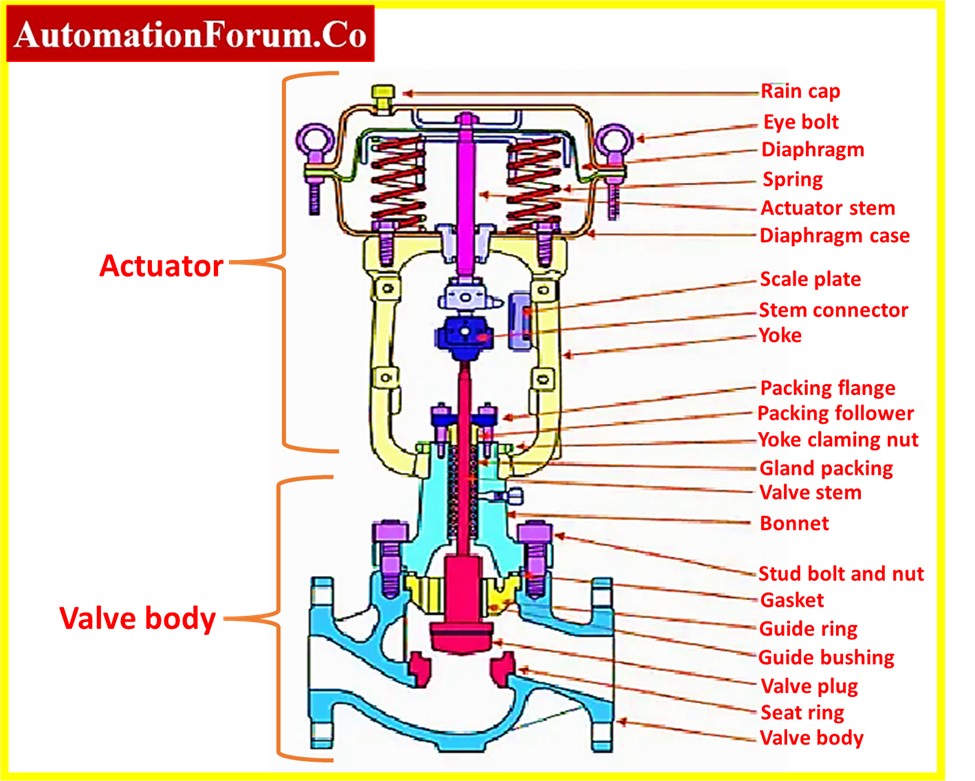
Inspection of control valve actuator
- Check for any corrosion, chipping, or damage on the actuator housing and body. Make sure all fasteners are properly secured and check for proper alignment.
- Look for any rust, scoring, or bending on the actuator stem.Ensure that its movement is unrestricted.
- Verify that the stem seal is intact by examining it for wear or damage.
- Additionally, check the actuator stem seal for air leaks; if any leak is found, the stem seal has to be replaced.
- A damaged stem can cause the valve to stick or fail to operate properly.
- Examine the diaphragm’s edge for evidence of wear, cracks, or tears. Make sure it is not distorted and that it is seated correctly. The replacement of the diaphragm is necessary if any deterioration is found.
- Additionally, watch for the diaphragm’s air passing. If the replacement of the diaphragm must be planned if it is passing.
- Examine the springs for any indications of deterioration, corrosion, or wear. Make that they are seated correctly and are providing the required force to actuate the valve.
- Check the fittings, hoses and tubing used for the air supply connections for leaks, damage or loose connections. Make sure the air supply is adequately filtered and regulated.
- Check the manual safety stem movement locking mechanism on the actuator to make sure it is functioning properly. Check that it engages and disengages properly to stop the valve from moving unintentionally.
- Check any limit switches or sensors for proper operation if they are present. Make sure the electrical connections are secure and producing reliable feedback signals.
- Find the lubrication spots the manufacturer has provided and make sure they are greased correctly. Use the suggested lubricant and adhere to the suggested lubrication intervals.
- To make sure they are working properly, inspect the air filter and regulator.
- Make that the air supply to the actuator complies with the manufacturer’s suggested requirements by checking it or referring the instrument data sheet.
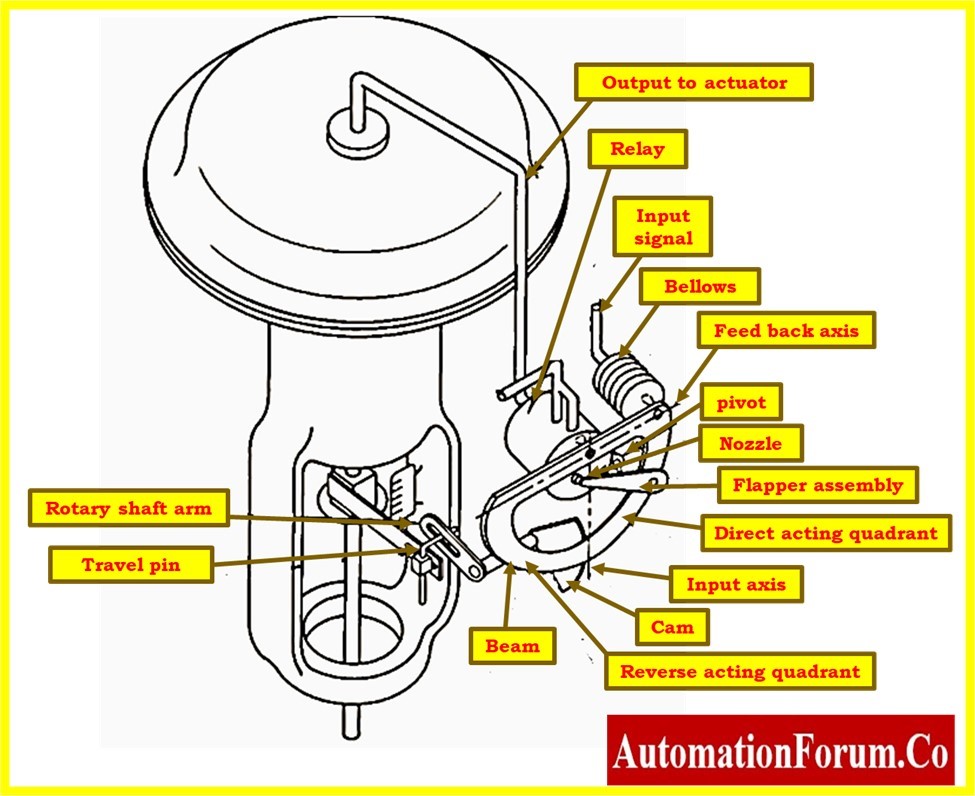
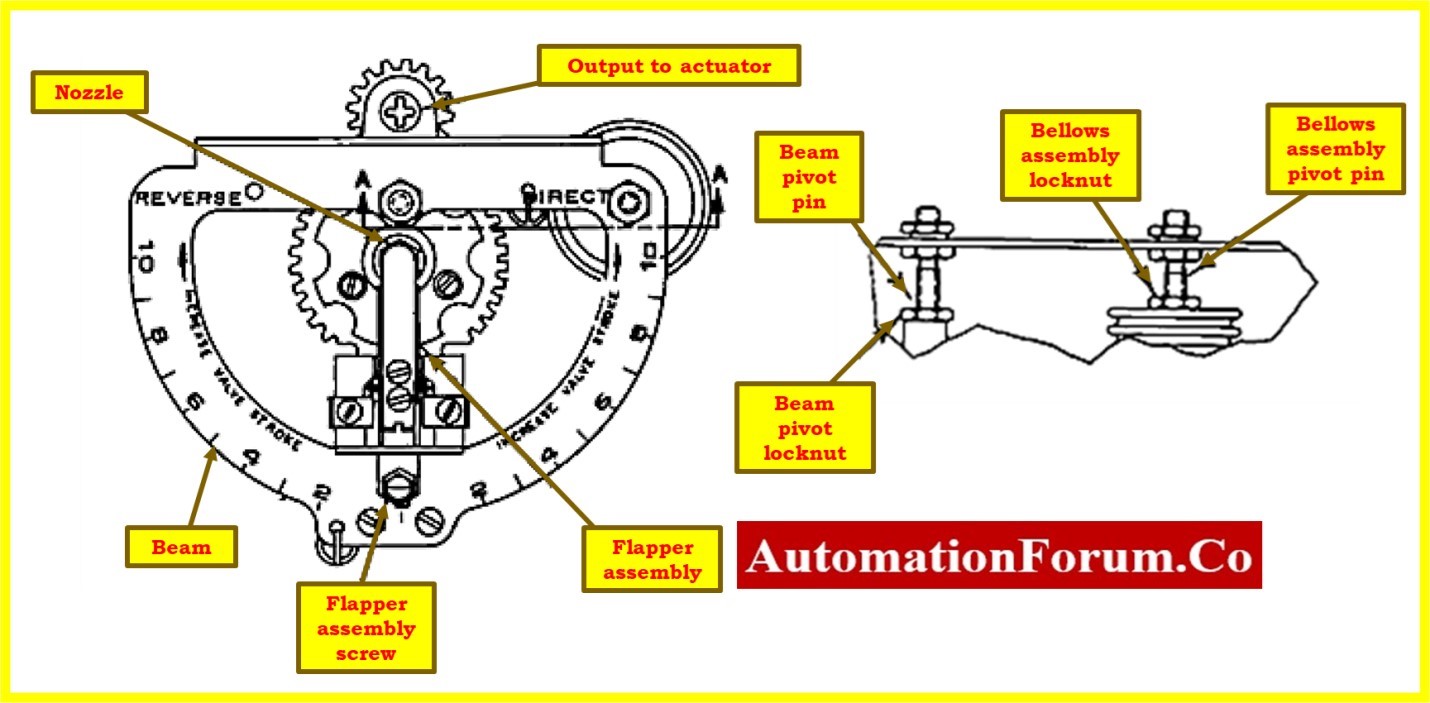
Inspection of control valve Positioner
- Check the positioner’s mounting to ensure it is securely attached to the actuator and properly aligned with the valve stem. Verify that all bolts, screws, or clamps are tightened appropriately.
- Inspect the air supply connection to the positioner for any leaks, loose fittings, or damage. Ensure that the air pressure is within the manufacturer’s recommended range.
- Inspect the wiring and electrical connections of the positioner to ensure they are secure, free from damage, and properly connected. Check for any signs of wear, corrosion, or loose connections.
- Verify that the control signal input to the positioner is accurate and stable. Check for any interference or fluctuations in the control signal that could affect the positioner’s performance.
- Inspect the condition of the pressure gauges in the positioner
Inspection of control valve Stem Connector
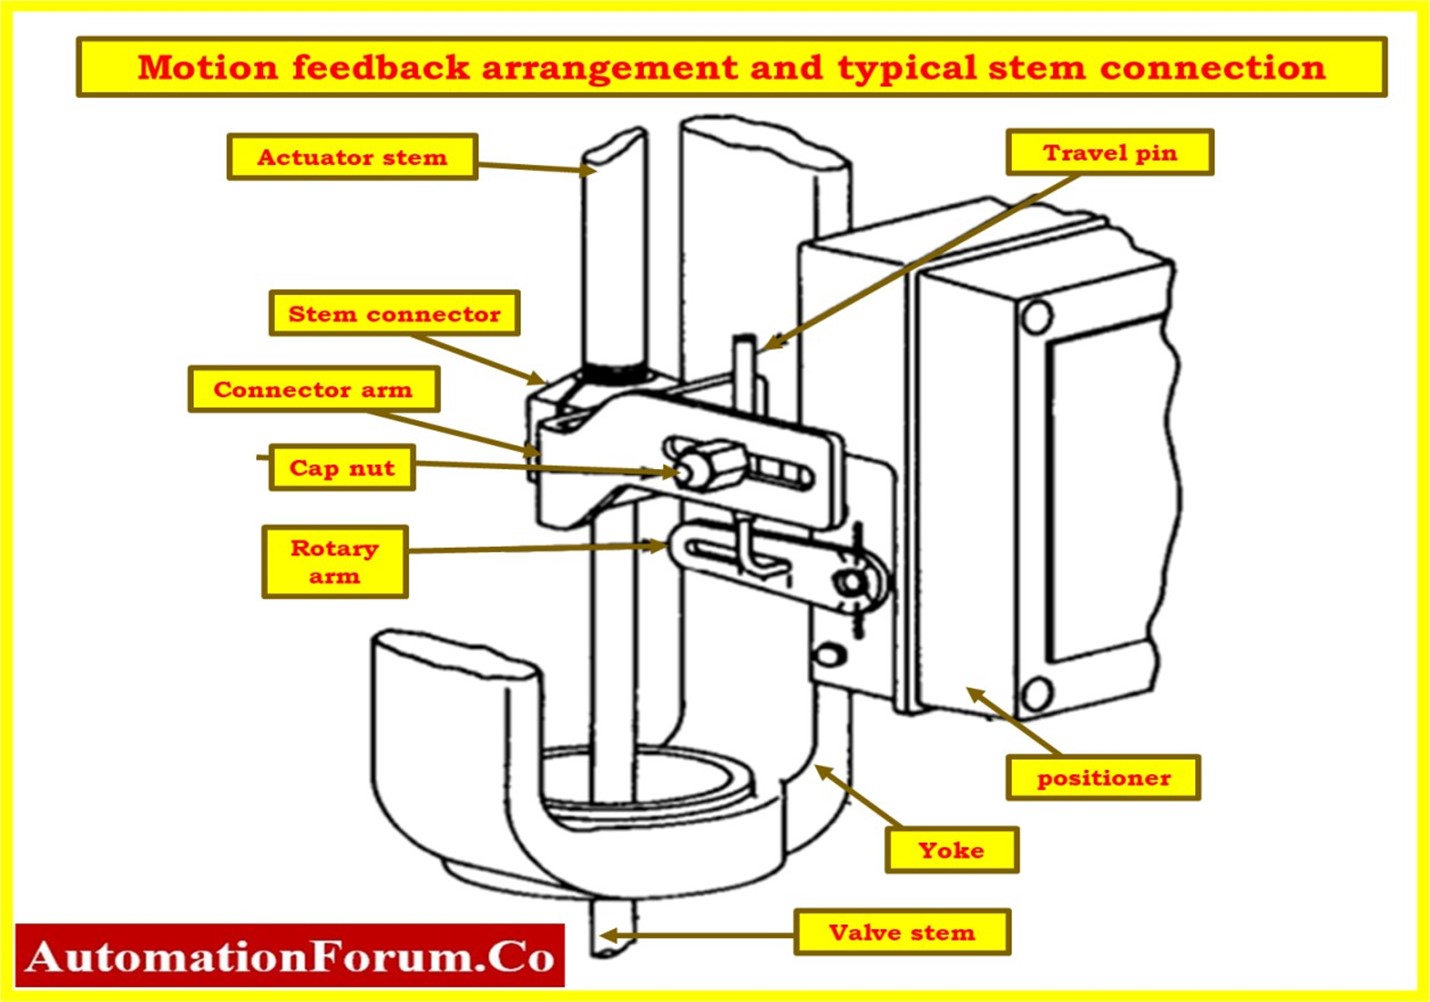
- Inspect the stem connector for any signs of damage, such as cracks, deformations, or excessive wear. A damaged stem connector can compromise the connection between the positioner and the valve stem.
- Verify that the stem connector is correctly aligned and securely fastened to both the positioner and the valve stem. Misalignment or loose connections can cause the valve to operate improperly.
- Ensure that the stem connector is properly lubricated according to the manufacturer’s recommendations. Adequate lubrication helps to reduce friction and maintain smooth operation.
Inspection of control valve Feedback Link
- Examine the feedback link for any signs of damage, such as bends, cracks, or excessive wear. A damaged feedback link can affect the accuracy of the position feedback.
- Verify that the feedback link is securely attached at both ends, ensuring proper connection between the valve stem and the positioner. Loose or improperly mounted feedback links can result in inaccurate positioning and valve hunting.
- Manually operate the valve and observe the movement of the feedback link. Ensure that it moves smoothly and without any restrictions or binding throughout the full range of valve travel.
- Compare the position feedback displayed on the positioner with the actual position of the valve during operation. Confirm that the feedback link provides accurate position feedback signal.
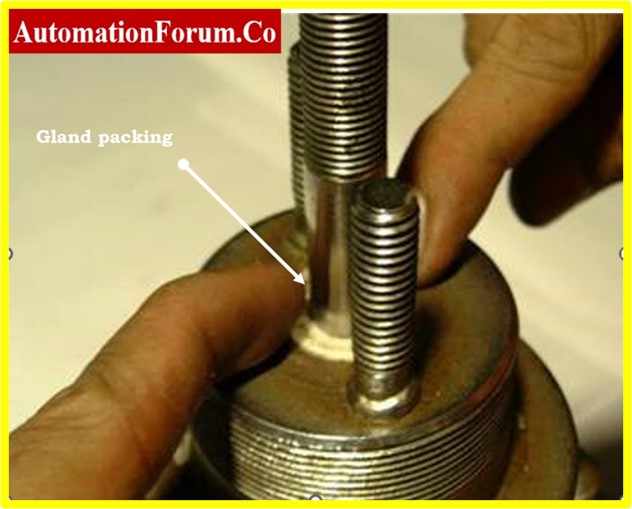
Inspection of control valve gland packing assembly
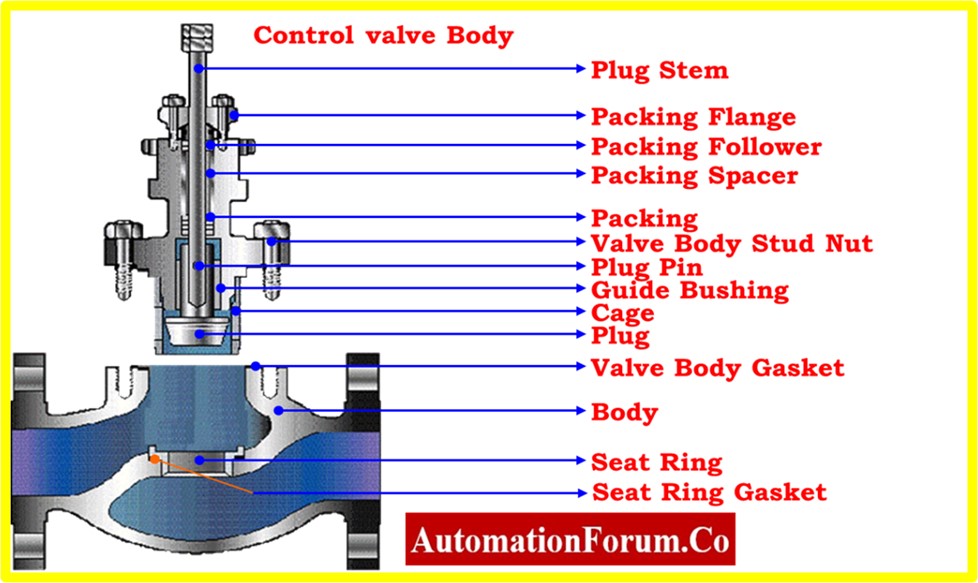
- Check the gland packing visually initially for any evidence of wear, breakage, or protrusion. Keep an eye out for any leakage signs, such as stains or moisture at the packing area.
- Pressurize the valve to perform a leakage test, then look for any visible leaks near the gland packing. If there is a lot of leakage, the packing might need to be changed or adjusted.
- Verify the gland packing’s compression and tightness. To provide a reliable seal around the valve stem while enabling smooth operation, the packing should be properly tightened. Be careful not to overtighten, though, as this could result in excessive friction or damage to the stem.
- Examine the gland packing material’s condition. Check for deterioration, hardness, or severe wear indications. Make that the packing material is appropriate for the operating environment and process fluid.
- Make sure the packing rings or braids are intact and correctly fitted by inspecting them. Make sure there are no openings or missing pieces that can reduce the efficiency of the sealing.
- Verify that the gland packing material meets the control valve application’s requirements for process temperature and pressure.
- Check the lock nuts, packing flange, packing follower, and other components for integrity.
- Check to see if the gland packing needs to be lubricated. To keep working properly, some packaging materials might need to be lubricated sometimes. Observe the manufacturer’s advice on lubrication intervals and appropriate lubricants.
- Consider whether the gland packing has to be adjusted if it is adjustable. To modify packing compression and achieve the proper sealing while reducing leakage, refer to the manufacturer’s instructions.
Inspection of control valve bonnet assembly
- Visually examine the bonnet for any indications of rust, cracks, or other damage. Pay close attention to threaded connections, gasket surfaces, and welds.
- Verify that the valve body is well secured to the bonnet. Look for any loose bolts or fittings and tighten them as necessary, adhering to the required torque guidelines from the manufacturer.
- Look for any evidence of wear, corrosion, or leaks in the gasket between the valve body and bonnet. To maintain a proper seal, replace the gasket as necessary.
Inspection of control valve body stem
- Look for bending, corrosion, or other damage on the stem. Examine the stem for any signs of wear from rubbing against the packing or seat.
- Make that the stem is moving easily and without too much resistance. Verify that the stem does not bind or stick when it is operating.
Inspection of control valve body seat and trim assembly
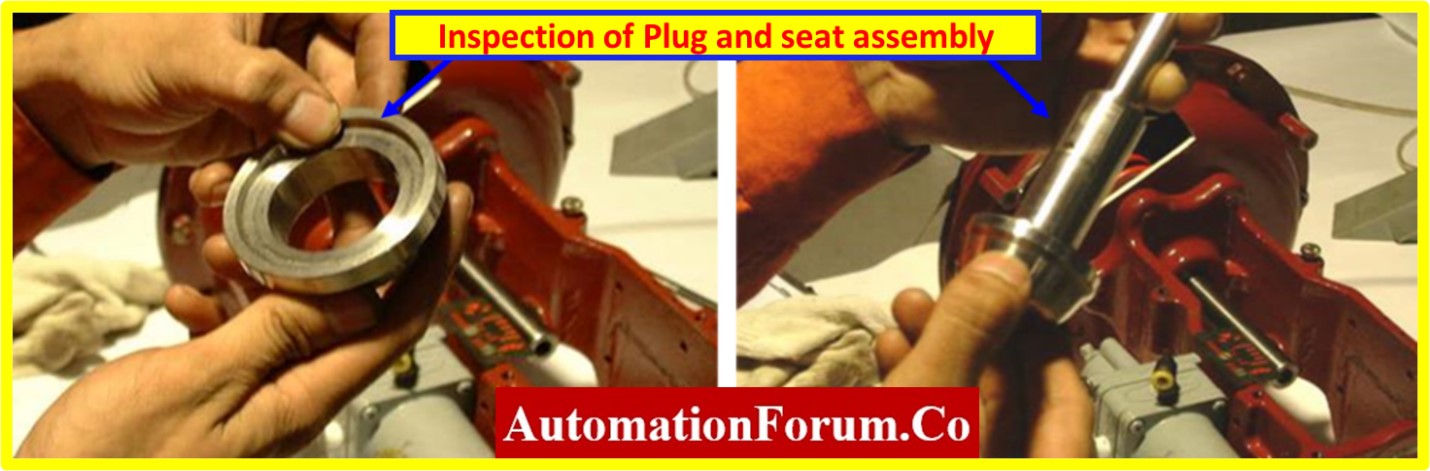
- Look for wear, scratches, erosion, or other deterioration on the seat. Check the valve for any cracks or deformations that might compromise its ability to seal.
- To make sure the seat is firmly secured in place, check its tightness. Leaks or improper valve closure may result from loose seats.
- Examine the internal discs, plugs, cages, and other portions of the valve trim for wear, damage, or corrosion. Check for any alignment issues or overly large clearances.
- Make that the trim parts are assembled correctly and are in good shape. Make sure that all of the fasteners are secure and that no components are missing or loose.
- Verify the trim materials’ suitability for the operating environment and process fluid. According to the requirements of the individual use, make sure the trim materials are corrosion and erosion resistant.
- Check the trim components’ clearances and alignment to make sure they are in the right positions for appropriate sealing and flow management. Leakage or reduced performance may be the result of incorrect clearances or misalignment.
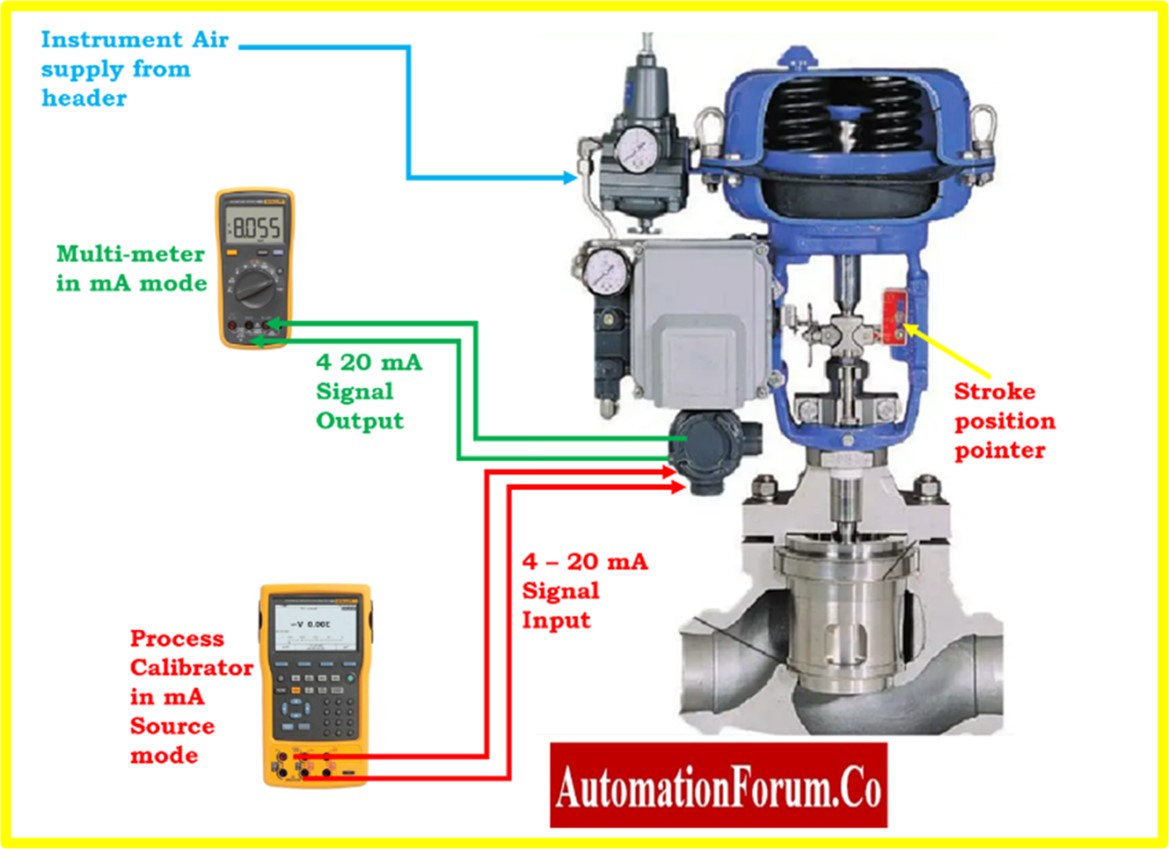
Checking the functionality of the control valve
- Examine the valve to make sure it opens and closes without any hesitation, sticking, or abnormal resistance. Make sure the valve opens and closes within the specified reaction time.
- Verify the control valve’s reaction to the input signal from the control system. Make sure the valve responds to changes in the control signal by making sure it modulates appropriately and accurately.
- Refer the below link for the stroke checking procedure of control valves
Stroke checking procedure of control valves
- Make sure the valve position feedback appropriately matches the valve’s real position. Compare the actual position of the valve during operation to the indicated position by position transmitter.
- Verify the bench setting of control valve actuator if required
- Refer the below link for the bench setting and calibration procedure of control valve.
How is control Valve calibrated?

- Leak testing should be done to look for any external leaks at the valve body, bonnet, packing, or other sealing locations. Also, make sure there is no passing inside the valve when the seat is closed.
- By providing a step change in the control signal and noting how quickly the valve reaches a stable position, you may determine the response time of the control valve. Compare the response time to the specifications provided by the manufacturer.
- Refer to the following link to fix the issue if the control valve has struck during operation.
How to do maintenance on struck control valve?
- If the control valve is equipped with a positioner, periodically calibrate the positioner to ensure accurate positioning of the valve. Adjust the positioner settings as necessary to align the valve position with the control signal.
- Refer the below link for the calibration procedure of control valve positioner
Calibration of control valve positioner
- To test the operation of the control valve fail action, isolate the instrument supply air and vent the residual air in the supply line.
Control Valve Accessories
Inspection and function check
Air Volume Boosters:
- Inspect the air volume booster for any signs of damage, corrosion, or wear.
- Check the pneumatic connections for tightness, proper sealing, and absence of any leaks or air leakage.
- Verify that the air volume booster is properly amplifying the air signal to provide the required output pressure. Ensure that it responds accurately to changes in the input signal.
Trip Valves:
- Inspect the trip valve for any signs of damage, corrosion, or wear.
- Check the electrical connections for tightness, proper insulation, and absence of any loose or damaged wires.
- Test the trip valve by simulating a trip signal and verifying that it activates and opens the valve as intended.
Quick Exhaust Valves:
- Inspect the quick exhaust valve for any signs of damage, corrosion, or wear.
- Check the pneumatic connections for tightness, proper sealing, and absence of any leaks or air leakage.
- Verify that the quick exhaust valve effectively exhausts air from the actuator, providing rapid valve closure or opening when required.
Filter Regulators:
- Inspect the filter & regulators for any signs of damage, excessive dirt, or clogging.
- Verify that the pressure output from the filter regulator is within the specified range and is stable.
- Check the functionality of the regulator by adjusting the pressure and ensuring it is maintained at the desired level.
- If the air filter is blocked then replace it.
Solenoid Valves:
- Inspect the solenoid valves for any signs of damage, corrosion, or wear.
- Check the electrical connections for tightness, proper insulation, and absence of any loose or damaged wires.
- Energize and de-energize the solenoid valves to verify that they open and close properly, and that the control signal is being accurately transmitted.
Documentation:
- It is essential to maintain accurate records of all control valve maintenance tasks, calibration dates, and any issues or repairs that are done on the system in order to troubleshoot and identify changes in the control valve performance.
- Record any observations, fixes, or replacements of any parts made during the examination. To document the actuator’s maintenance history and to make future inspections and troubleshooting easier, keep a record of the inspection.
- This information should be recorded by the control valve maintenance team in a logbook or database so that it may be used for analysis and reporting.
Completion of PM maintenance
- Clean the tools and equipment after completing the control valve PM, store it securely, and make a note of the details from the control valve PM check list for future reference.
- Check to see that the workspace of the control valve PM has been kept neat.
- De-isolate the equipment and return the instrument air header’s air pressure to normal after the control valve PM.
- Verify the control valve is functioning properly before utilizing it.
- Close the work permit.
Preventive maintenance checklist – Download
Please click on the link that is provided below in order to obtain the preventative maintenance checklist of control valve in excel format.

Control Valve Preventive Maintenance Checklist
| Inspection Item | Checkpoints | Status |
| Valve Body | Leakage, corrosion, cracks | OK/Not OK |
| Actuator | Air leaks, diaphragm condition | OK/Not OK |
| Valve Stem | Bending, scoring, corrosion | OK/Not OK |
| Gland Packing | Leakage and tightness | OK/Not OK |
| Positioner | Calibration and response | OK/Not OK |
| Tubing and Fittings | Loose connections and leakage | OK/Not OK |
| Solenoid Valve | Functional test | OK/Not OK |
| Limit Switch | Switching operation | OK/Not OK |
| Seat Leakage | Internal passing | OK/Not OK |
| Stroke Test | Full open and close verification | OK/Not OK |
Control Valve Maintenance Frequency Table
| Maintenance Activity | Frequency |
| Visual inspection | Weekly |
| Air leakage inspection | Monthly |
| Positioner calibration verification | Quarterly |
| Stroke testing | Quarterly |
| Gland packing inspection | Quarterly |
| Actuator diaphragm inspection | Half yearly |
| Internal trim inspection | Yearly |
| Seat leakage test | Yearly |
| Complete overhaul | Based on service condition |
Common Control Valve Problems and Troubleshooting
| Problem | Possible Cause | Recommended Action |
| Valve hunting | Improper tuning or stiction | Tune controller and inspect packing |
| Slow valve response | Air leakage or clogged tubing | Check air supply and tubing |
| Valve not stroking fully | Actuator spring issue | Inspect actuator assembly |
| Excessive vibration | Oversized valve | Verify valve sizing |
| Internal passing | Seat damage | Inspect seat and trim |
| Air leakage | Damaged diaphragm or fittings | Replace faulty components |
| Position feedback mismatch | Positioner calibration issue | Recalibrate positioner |
Symptoms of a Failing Control Valve
The following symptoms may indicate control valve problems:
- Unstable process variable
- Excessive valve movement
- Valve hunting
- Slow response time
- Air leakage from actuator
- Abnormal vibration or noise
- Inaccurate valve position indication
- Internal seat leakage
- Excessive stem friction
- Inconsistent flow control
FAQ on Control Valve Preventive Maintenance
What is control valve preventive maintenance?
Control valve preventive maintenance is the scheduled inspection, testing, cleaning, calibration, and servicing of control valves to prevent unexpected failures and ensure reliable process control.
How often should control valves be maintained?
Control valve maintenance frequency depends on service conditions, process fluid, operating cycles, and criticality. Visual inspections are usually performed weekly while complete overhauls may be done yearly.
What causes control valve hunting?
Control valve hunting is caused by improper PID tuning, valve stiction, oversized valves, actuator problems, or faulty positioner calibration.
Why is valve stroke testing important?
Valve stroke testing verifies that the control valve opens and closes correctly and responds accurately to control signals.
How do you identify seat leakage in a control valve?
Seat leakage can be identified by checking for internal passing when the valve is in fully closed position.