- Control Valve Not Responding – Troubleshooting Flowchart
- Safety First – Isolation and Preparation Steps
- Step-by-Step Diagnostic Procedure
- Step 1: Verify the Control Signal
- Step 2: Check Air Supply and Actuator Health
- Step 3: Isolate the Actuator from the Valve
- Step 4: Diagnose the Valve Body
- Common Internal Causes Found in Workshop
- Understanding the System Interdependencies
- Pro Tips for Effective Troubleshooting
- Advanced Troubleshooting Considerations
- Importance of a Preventive Maintenance Strategy
- Typical Tools Required for Control Valve Troubleshooting
- Control Valve Troubleshooting Checklist (Excel Download)
- Frequently Asked Questions – Control Valve Not Responding Troubleshooting
Reported Issue: A control valve in the process area does not move or respond to control system commands.
Objective: To safely and quickly find out if the problem is with the instrument signal, actuator, or valve body, and then fix the valve so that it works properly again without putting plant safety at risk.
Control Valve Not Responding – Troubleshooting Flowchart
🔧 Control Valve Troubleshooting
Systematic Diagnostic Flowchart
Repair/Replace
Workshop Repair
Safety First – Isolation and Preparation Steps

To safely and quickly find out if the problem is with the instrument signal, actuator, or valve body, and then fix the valve so that it works properly again without putting plant safety at risk.
Coordination and Permits
Safety is the first and most important thing to do before touching the valve or any of the equipment that is attached to it. Control valves deal with process fluids that may be under high pressure, temperature, or even dangerous circumstances. Accidents can happen if you don’t handle things right.
Isolate the Process
Next, cut off the valve from the process line. You can achieve this by closing the block valves upstream and downstream or by going around the valve. Before you start any inspection, be sure that the length of pipe is not under pressure and has cooled to a safe working temperature.
Secure Energy Sources
Shut off and lock off any electrical, air, or hydraulic sources that are linked to the valve or positioner. Make sure these isolation locations are easy to find.
Warning: Never attempt to troubleshoot, stroke, or force a control valve that is still in service or pressurized. Doing so can cause mechanical damage or result in serious injury.
Troubleshoot Control Valve Passing Issues: How to Troubleshoot a Control Valve Passing Problem after Overhauling: Complete Root Cause Analysis
Step-by-Step Diagnostic Procedure
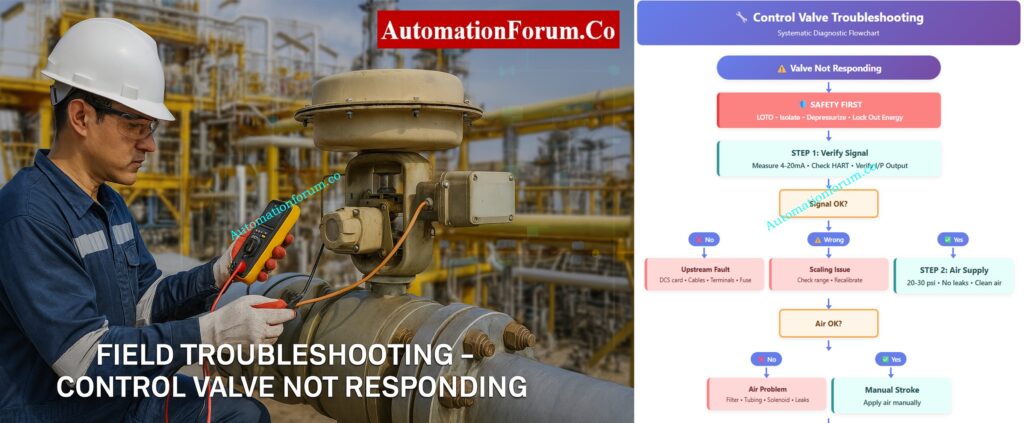
A organized diagnostic sequence makes it easy to find the issue location fast, without having to take things apart or stop working. Let’s go through each step carefully.
Must-Have Control Valve Accessories: Essential Control Valve Accessories for Reliable Process Control
Step 1: Verify the Control Signal
Purpose:
Before you touch the valve, make sure that the problem isn’t in the control command chain, which goes from the DCS/PLC to the valve positioner.
Action
Make sure that the electrical or pneumatic signal from the control system is getting to the valve positioner correctly.
How to Do It
- Use a calibrated digital multimeter (DMM) or loop calibrator to measure the 4–20 mA analog signal at the input terminals of the valve positioner.
- Look at the DCS faceplate to see the controller output and compare it to the measured signal.
- If the valve has a HART positioner, utilize a HART communicator or field communicator to make sure that the setpoint (SP) and feedback (PV) are what you anticipate them to be.
- Use a pressure gauge to check the output pneumatic signal for I/P (current-to-pressure) converters. It should be a straight line with the input current, such 4 mA = 3 psi and 20 mA = 15 psi.
- Check the junction box for loose or corroded terminals, broken wires, or water getting in.
Key Control Valve Performance Parameters: Essential Control Valve Performance Parameters
Findings and Interpretation
- There is no control signal, hence the problem is upstream. A bad DCS output card, an open circuit in the field cable, a shorted loop, a loose terminal, a blown fuse, or wrong marshalling could all be to blame.
- Signal is there but wrong: Check to see whether the DCS and field device have different signal scales or ranges.
- Signal is present and correct, so go on to Step 2: Check the health of the air supply and actuator.
Select Control Valves for Harsh Conditions: Control Valve Selection and Recommended Practices for Harsh Process Conditions
Step 2: Check Air Supply and Actuator Health
Purpose:
The actuator is what makes the valve work. Without clean, stable air, even a flawless signal will not move the valve.
Action
Make sure the actuator gets enough clean air and that it reacts correctly when signals change.
How to Do It
- Use a test gauge to check the instrument air pressure at the actuator inlet. For pneumatic actuators, the normal range is 20 to 30 psi (see the nameplate or datasheet).
- Make sure that the supply pressure stays the same. A sudden dip could mean that there is a problem with the air system.
- Make sure the air is clean. Oil, grime, or moisture can make things move slowly or stick.
- Pay particular attention to any air leaks you can hear around tubing, fittings, or diaphragm chambers.
- Use a hand regulator to slowly change the air pressure at the actuator inlet to determine if the valve stem moves smoothly over its range.
- For spring-return types, check to see if it goes all the way back when the air is let out.
Benefits of Using Valve Positioners: Why You Should Use Control Valve Positioners?
Findings and Interpretation
- If there is no air supply or a leak, check for a clogged filter regulator, bent tubing, a broken solenoid, or a torn diaphragm.
- The actuator or mechanical linkage may be stuck, which means there is enough air yet the valve won’t move. Step 3: Separate the actuator from the valve.
- Hunting, or unstable actuator movement, can happen because of air starvation, a fault with the positioner feedback, or too much friction in the valve stem.
Tip:
Check the bowl and drain of the air filter regulator all the time. One of the most common reasons for actuator failure in the field is contamination.
Importance of Control Valve Bench Set: Why is Control Valve Actuator Bench Set Important ?
Step 3: Isolate the Actuator from the Valve
Purpose:
To find out if the actuator is working properly or if the valve’s mechanical parts (trim, stem, plug) are stuck.
Action
To see how they move on their own, disconnect the actuator from the valve mechanically.
How to Do It
- Make sure there is no energy flow. Turn off all sources of air, electricity, and hydraulics. Follow the plant’s LOTO (Lock-Out/Tag-Out) procedure to tag and lock out the system.
- Carefully take the actuator stem off of the valve stem or lever coupling.
- To make sure the actuator moves all the way and smoothly, manually stroke it while delivering controlled air pressure.
- If the actuator is electric, use the manual handwheel mode or jog the motor in test mode to see it move.
- Make sure the position feedback linkage isn’t stuck or out of alignment.
Safety Valve Testing and Calibration: Safety Valve Testing and Calibration Procedure
Findings and Interpretation
- The actuator travels freely when it’s not attached. The actuator and positioner are both fine. The problem is with the valve body. Go on to Step 4.
- The actuator is broken if it doesn’t move or just moves part of the way. Some such reasons are:
- Ruptured diaphragm or piston seal leakage
- Broken return spring in spring-return actuators
- Corroded or rusted piston rod
- Sticking due to internal contamination or water ingress
After maintenance, fix or replace the actuator and re-calibrate the positioner.
Best Practice:
While not connected, use a controlled input signal to do a bench stroke test on the actuator to make sure it works properly across the whole range.
Calibrate Your Control Valve Positioner: Calibration Procedure of Control Valve Positioner
Step 4: Diagnose the Valve Body
Purpose:
If the signal and actuator are working, the valve body probably has mechanical problems.
Action
Check for internal blockages, stuck stems, or friction caused by packing.
How to Do It
- After making sure that the actuator works, reconnect it.
- Try to use the valve’s handwheel or override mechanism to manipulate it by hand.
- Check to see if the valve stem moves smoothly in a straight line or in a circle, depending on how it was made.
- To see if too much tightening is producing stem friction, slightly loosen the gland packing nuts.
- Check for leaks or buildup of product around the stem region, since this can be a sign of internal sticking.
- If you can, check the valve position feedback (via a position transmitter or HART PV) while sending small step signals.
- For important valves, do a partial stroke test (PST) to make that the travel is correct without completely stopping the flow of the process.
Findings and Interpretation
- After relaxing the packing, the valve slides. The stem packing was too tight. Change the packing set or adjust the recommended torque.
- Valve still won’t move: either something is blocking it or it broke. Some possible causes are:
- Plug or disc jammed due to process debris
- Bent stem or damaged guide bushing
- Corrosion or scaling inside the trim
- Seat-ring or cage galling
You need to take the valve out and bring it to the shop so that it may be taken apart, cleaned, and checked.
Step-by-Step Control Valve Calibration: Control Valve Calibration Procedure
Additional Recommendations:
- Use the positioner’s feedback potentiometer or travel sensor to always check the valve travel calibration.
- Use a diagnostic tool (like Fisher DVC or SAMSON TROVIS) to do a stroke test and signature analysis after maintenance to make sure everything is working properly before putting it back into service.
- Write down all of your findings in the valve maintenance journal, including signal readings, pressures, and any problems you see for future reference.
Fix Valve Hunting from Positioner Issues: Control Valve Hunting due to Valve Positioner: Troubleshooting
Common Internal Causes Found in Workshop
After being taken apart in a safe, controlled setting, a number of mechanical problems can be found to be the main causes:
Corrosion of Internal Components:
Stem pitting, plug seizure, or actuator shaft binding can happen when process fluids are corrosive or the wrong materials are used.
Solid Buildup or Coking: In procedures that use hydrocarbons or polymers, residues can build up between the plug and seat, stopping movement.
Mechanical Damage: If the stems are bent, the seats are eroded, or the metal-to-metal welding is bad, the valve won’t move.
Worn Packing or Bearings: If the packing gland gets too dirty or worn out, it might make the stem stick in the middle of a stroke.
Improper Assembly or Misalignment: If the actuator linkage is not put together correctly or the positioner is not calibrated correctly, it can cause mechanical interference.
Motorized Control Valve Calibration Guide: Calibration Procedure for Motorized Control Valve
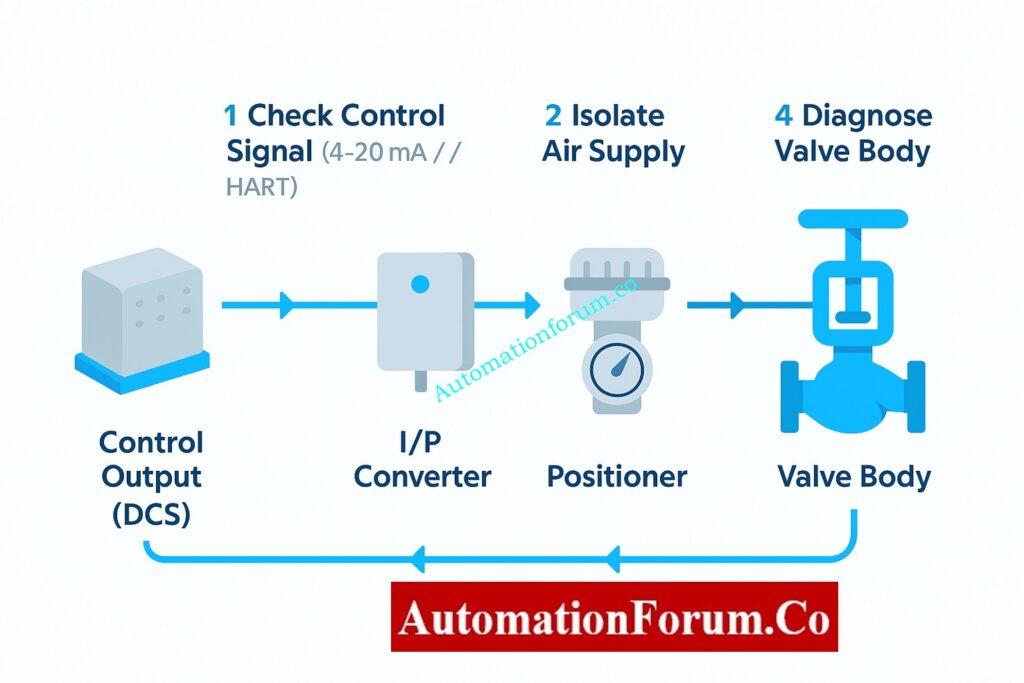
Understanding the System Interdependencies
Control valves are one part of a bigger system of automation. A valve that doesn’t respond doesn’t automatically signify that the mechanism has broken; it could be a problem somewhere in the signal chain.
Signal Chain Breakdown
Let’s take a quick look at how these parts work together:
- Controller Output (DCS/PLC):
Makes a 4–20 mA command signal that is based on how much the process needs. - I/P Converter or Positioner:
Turns the electrical signal into air pressure (3–15 psi). - Actuator:
Changes air pressure into mechanical motion. - Valve Body:
Changes the flow of fluid based on the movement of the stem or stopper.
If there is a break in this chain, whether it is electrical, pneumatic, or mechanical, the valve may stop working.
Troubleshoot Control Valve Noise Problems: Troubleshooting Control Valve Noise and Cavitation
Pro Tips for Effective Troubleshooting
Keep the following best practices in mind to make the troubleshooting process faster and easier to repeat:
- Document Everything:
Before you start, write down the valve tag number, the readings from the control signal, the pressures in the air supply, and any feedback from the positioners. This documentation allows you compare how things worked before and after maintenance. - Check Linkages and Mountings:
If the linkage arms between the positioner and actuator are loose or not lined up correctly, they might give erroneous position feedback and cause the actuator to move in strange ways. Make sure they are tight or in the right place. - Inspect Feedback Mechanisms:
Check to see if the feedback potentiometers or sensors are working properly for smart positioners. Bad sensors can make the valve look “dead” even when it is working fine. - Verify Grounding and Shielding:
Electrical noise can make it hard for signals to get through, especially in analog loops. Make sure that cable shields are only grounded at one end, which is usually the side with the control panel. - Perform Full-Stroke and Partial-Stroke Tests:
After fixing the problem, do both full-stroke (0–100%) and partial-stroke tests to make that the travel is smooth, linear, and repeatable. - Check Packing Leakage:
After re-pressurizing the valve, check for leaks around the stem packing using a soap solution or leak detection spray. - Always Return to Safe Condition:
When the tests are done, put the valve back in its usual functioning mode and let the control room know before taking away the bypass conditions.
Advanced Troubleshooting Considerations
If all the basic checks pass but the valve still doesn’t work, you might want to look into these more advanced diagnostic options:
- Positioner Calibration Errors: New smart positioners (such Fisher, Siemens, ABB, and Samson) might lose their calibration if the power goes out or the settings are wrong. Use the manufacturer’s handheld communicator or software tool to tune and calibrate again.
- Sticky Valve: If a valve doesn’t move much over time, the seal can adhere to it. This doesn’t happen as often when you do regular partial-stroke testing.
- Actuator Spring Fatigue: In designs using spring returns, springs that are too weak may not produce enough counterforce, which can cause movement to slow down or stop.
- Air Locking or Water Condensation: If moisture becomes stuck in pneumatic lines, it can freeze or stop the flow of pressure. It is very important to drain filters and traps on a regular basis.
- Electrical noise and signal distortion: If the positioner gets signals that change, check the grounding and shield termination. If shields aren’t grounded properly, they can make loops that cause noise.
Common Causes of Valve Hunting: Main Causes of Control Valve Hunting
Importance of a Preventive Maintenance Strategy
Most of the time, control valve failures don’t happen all at once; they happen over time. A well-planned preventive maintenance (PM) schedule can cut down on unscheduled shutdowns by a lot.
Key Preventive Measures
- Plan regular valve stroke checks during planned outages.
- Check and clean air filters and regulators from time to time.
- At the prescribed times, change the actuator seals and diaphragms.
- To keep moisture and dust out of field junction boxes, make sure they are properly protected from the outdoors.
- For every change, make sure you update the as-built drawings and loop diagrams.
Control Valve Leakage Testing Standards: Control Valve Leakage Testing, Types, and Calculation Standards
Typical Tools Required for Control Valve Troubleshooting
- Digital multimeter (for checking 4–20 mA signals)
- Pressure gauge with a range of 0 to 30 psi
- HART device or handheld communicator (for smart positioner diagnostics)
- Air supply source and tubing that can be moved
- Wrenches and hex keys that can be changed
- Spray for finding leaks
- Safety gear includes gloves, goggles, a face shield, and hearing protection.
Don’t assume that the valve is broken right away. Before doing any mechanical work, always check the signals and power.
Write down and tell the control room and maintenance records about whatever you uncover.
Use preventative measures to cut down on the number of times valves don’t work in the future.
Control Valve Troubleshooting Checklist (Excel Download)
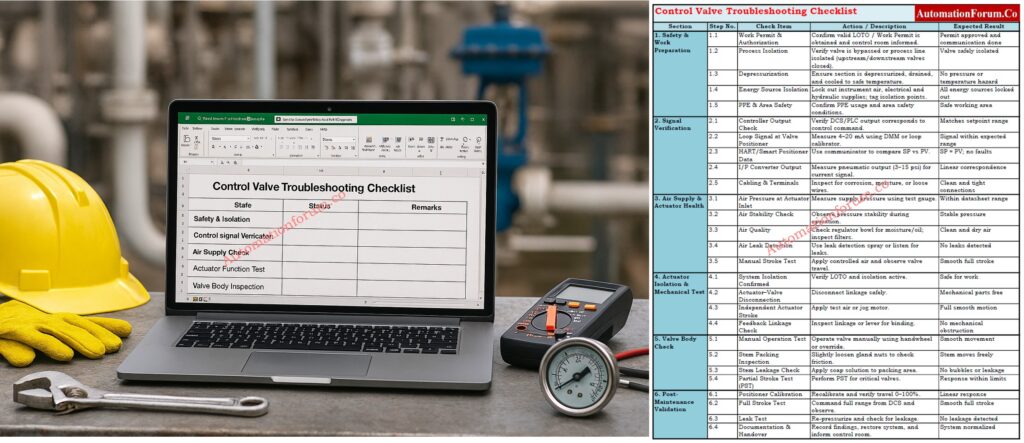
A useful checklist for maintenance engineers to use in the field to help them figure out what’s wrong with control valves. It includes procedures for safety, signal verification, actuator testing, valve inspection, and post-maintenance validation. Use the link below to download
Refer the below link to test your knowledge with our Advanced Control Valve Troubleshooting Quiz for Process Control Engineers
Frequently Asked Questions – Control Valve Not Responding Troubleshooting
What is the common problem in a control valve?
Some common problems are not getting enough air, becoming stuck because of dirt or corrosion, worn packing, and a positioner or actuator that doesn’t work right. These faults often make the valve move in strange ways or not respond to control signals.
Why is my control valve not opening?
If there is no control signal, the air pressure is too low, the actuator is broken, or anything is blocking the valve trim, it might not open. Before checking the mechanics, you should first check the air supply and signal chain.
How do you troubleshoot a control valve?
Make sure the control signal, air supply, actuator movement, and valve stem work. Always check the positioner feedback and recalibrate the valve after repairs to make sure it works properly in automated mode.
What happens when a control valve fails?
Flow control is lost, which can lead to process instability, pressure problems, or moving to the fail-safe position. This can set off alarms or make the system shut down on its own, depending on the process.
What will happen if the valve is not functioning?
The flow or pressure of the process becomes unstable, which can cause production loss, safety issues, or damage to equipment. To avoid more problems with the process, troubleshooting and isolation must be done right away.
How do you tell if a control valve is fail open or closed?
Look at the actuator nameplate or watch the valve move when the air is lost. “Air-to-open” indicates “fail-close,” and “air-to-close” means “fail-open.” This information helps make sure that the right fail-safe action is taken in an emergency.