What is a pH Electrode?
- What is a pH Electrode?
- What is benchtop pH meter?
- Purpose and Scope:
- Tools required for pH electrode calibration:
- Safety
- Calibration Setup
- Calibration principle
- What is a 3 point calibration pH meter?
- Calibration procedure
- What should be the slope and offset for pH calibration?
- Sample calculation
- Recording calibration
- Completion of calibration
- Sample pH meter calibration report
pH electrodes, which are analytical sensors, are employed to measure the potential of hydrogen (pH) or the negative logarithm of the hydrogen ion activity in a solution. Even though pH electrode technology has not advanced significantly in the last 50 years, making pH electrodes is still a craft. The hydrogen ion concentration may be sensed using a particular glass composition used to make pH electrodes. The specific glass body of an electrode is blown to its configuration by glass blowers; it is not a very complex or ‘high tech’ operation, but it is a key and important stage in pH electrode fabrication nevertheless.
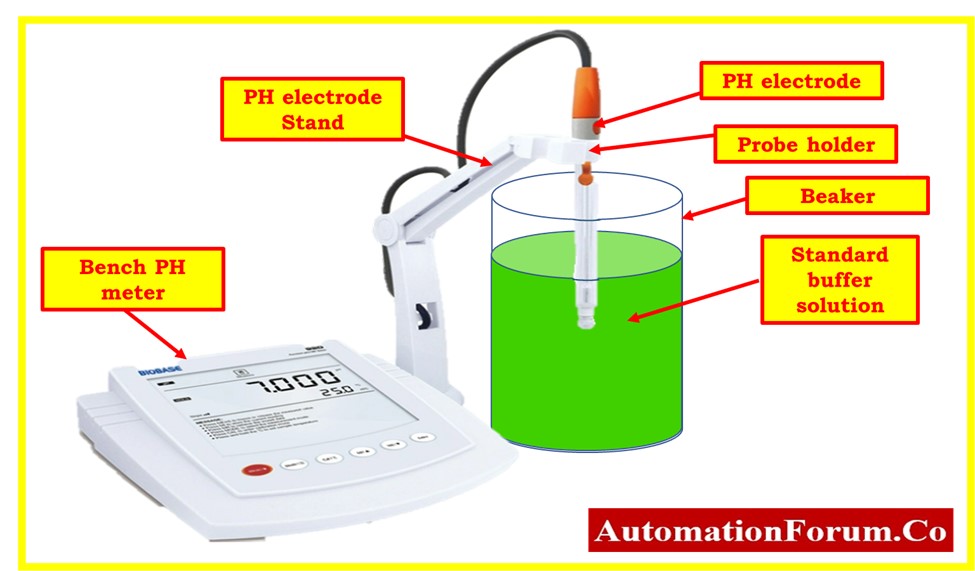
What is benchtop pH meter?
An electronic device known as a benchtop pH meter is used in a variety of sectors to evaluate the acidity and alkalinity of liquid or semi-solid samples. It has uses in the testing of wastewater, potable water, food and beverages, chemicals, and pharmaceuticals.
Purpose and Scope:
This process gives a detailed explanation of how to calibrate a pH electrode in the workshop using standard buffer solutions.
Tools required for pH electrode calibration:

- Necessary hand tools.
- Standard buffer solutions.
- Electrode cleaning solution.
- Beaker.
- Soft tissue paper for cleaning electrodes.
- Soft Cloth for cleaning.
- Reference manual
Safety
- Please click the link provided below for details on basic safety, general principles, and calibrating activities in process industries.
- Locate the pH meter you want to calibrate, make sure it is the right pH meter, and note any relevant data, such as the tag number (e.g., the manufacturer, model number, pH range, etc.).
- Turn off the power to the pH meter. Verify that the source of the power supply is shut off (e.g., turn off the breaker or unplug the wires).
- Keep in mind that this general procedure may need to be modified depending on the specific pH meter and calibration location. Always follow any manufacturer instructions and local safety regulations while dealing with pH meters or other process equipment.
- Follow all appropriate lockout/tagout procedures to prevent an unintended start-up or use of the pH meter. Make careful to keep the pH meter away from the process personnel.
Calibration Setup
- The pH meter must be placed in a location that is free of any vibrations or electromagnetic interference in order for accurate readings to be obtained. Also, the area has to be well-lit and ventilated.
- Gather all of the solutions, necessary tools, and other equipment that were mentioned before.
- Place the pH probe holder together, then fasten it to the meter
- An adapter should be connected to the power jack. Make sure the adapter jack is securely inserted into the meter when you slide it in.
- Connect a sensor probe to the correct port to measure pH. Connect a temperature sensor connection to the proper port for a pH probe that includes a temperature sensor.
- The buffer solutions may irritate the eyes and skin, and they increase the likelihood of injury if ingested or breathed. While handling solutions, always use lab coats, gloves, and safety glasses. Always read buffers at their precise pH. Avoid submerging electrodes in buffer solutions before giving them a good rinse in deionized water.
- Always refer to the MATERIAL SAFETY DATA SHEET (MSDS) of all buffer solutions, and keep copies of the MSDS in the locations where work is being done.
Calibration principle
What is a 3 point calibration pH meter?

- For pH probes, this three-point calibration is really the best way to get the most precise results.
- The three-point calibration should be carried out in the following order: a buffer solution with a moderate pH, a low pH (acidic), and a high pH (basic).
- Despite this, the most typical buffer solutions have a pH of neutral 7, acidic 4, and basic 10. (simplifying the process of doing a three-point calibration).
- With the help of the data sheet that is included with the pH metre, you can confirm the calibration range.
Calibration procedure
- The pH meter should be turned on and let at least 30 minutes to warm up.
- If the pH probe is a new probe or was previously placed inside the bottle with cap, unscrew the bottle and cap to remove the pH probe soaker container.

- Before using, rinse the probe tip with water that has been deionized or distilled or the cleaning solution that the manufacturer recommends.
- If the probe tip is dry for a long time, immerse it in a KCl solution for 30 minutes.
- Do not over-wipe the pH probe dry. Over-wiping the probe may result in static and calibration and measurement instability.
- After washing it with a cleaning solution, dry the electrode with a soft tissue.
- Avoid rubbing the bulb as this may lead to a buildup of static electricity.
- Choose the pH buffer solution with value 7, and then pour enough solution into a clean container to completely submerge the probe tip in it.
- To obtain a sample that is representative of the whole, gently stir the probe in the buffer solution.
- Place the pH electrode within the buffer solution and give it some time to stabilize.
- Give the pair 30 seconds to attain thermal equilibrium with the buffer.
- In accordance with the buffer solution’s temperature, adjust the pH benchmeter’s temperature compensation.
- The temperature may be compensated for automatically or manually when using this pH meter to take readings.
- Only when a temperature sensor is inserted into the meter does automatic temperature correction take place.
- The default value for manual temperature correction is 25°C. Also, you have the option of manually adjusting the temperature to suit your needs while working (as measured by a separate thermometer).
- Adjust the pH meter to read pH 7 once the electrode has stabilized. If pH 7 is not displayed, make adjustments until it is.
- Examine the electrode slope and offset, and if required, correct the calibration.
- Measure the pH of the buffer solution once the electrode has been calibrated.
- Verify the bench meter’s voltage reading. The voltage reading must fall within the pH electrode’s manufacturer-specified range.
What should be the slope and offset for pH calibration?

- A 7 pH buffer should typically yield a 0 mV signal; the line’s slope is 59.16 mV. The pH sensor’s output changes by 59.16 mV for each change in the pH unit.
- The pH slope % calculation shows that your pH probe is operating appropriately. A slope of 85 to 105% and an offset of +30 mV are often appropriate. You might need to get a new pH probe if it falls outside of this range.
- Check the electrode for damage or contamination if the voltage measurement is beyond the authorized range. If required, clean or replace the electrode.
- A new pH probe must be calibrated before use when it is attached to an analyser. Every pH sensor needs to be calibrated to get precise, consistent readings. Recalibrating on a regular basis at predetermined intervals is also important.
- It is significant to note that for the best accuracy, the sensor(s) and analyzer should be calibrated together.
- To verify the pH electrode’s accuracy, repeat the test using a new buffer solution.
- In order to guarantee precise and reliable pH measurements, it is crucial to routinely verify the pH electrode voltage.
- Repeat the process of rinsing the electrode with distilled water, pat it dry, and then put it in a buffer solution with a pH of 4 and a pH of 10. (depending on the range of your meter).
- Because high pH buffers have a tendency to absorb ambient CO2, you should always use fresh buffer solutions. Perform the calibration as soon as the buffer has been poured into the beaker.
- When the electrode has become stable, the meter must be calibrated such that it reads the appropriate pH.
- Repeat the process of rinsing the electrode with distilled water, and then put it back into the buffer solution at pH 7.
- The meter is calibrated and ready for use if pH 7 is accurately shown. If not, try again with the calibration until it reads correctly.
- In order to calibrate the pH meter to the desired tolerance, repeat the calibration procedure as necessary.
- Depending on the pH meter being used, the calibration process may need to be modified. Because of this, before starting, please read the manufacturer’s instructions.
Sample calculation
- Use the following formula to calculate the slope percentage of the pH probe:

- For example the pH electrode produces a voltage of -15 mV when pH is 7.00, and a voltage of +160 mV when pH is 4.00.
Absolute mV difference is equal to +160 mV – (-15 mV) = +175 mV
% slope = (175 mV / 3 pH units)/(59.16 mV / pH units) X100
% slope = = 98.6%
Recording calibration
- Check the linearity of the pH meter’s output readings at 4pH, 7pH, and 10pH in both the upscale and downscale directions to make sure it is producing the correct numbers.
- If the pH meter reading value does not fall within an acceptable range, recalibration is required. Once more, if the output values have departed from the permitted range, a pH meter electrode for pHmeter has to be fixed or replaced.
- No further calibration of the PH electrode is required if every output result (+/-%) falls within acceptable limits.
- The output values from the pH meter should be entered into the as found/as left column of the blank calibration report with pH electrode data.
Completion of calibration
- When the calibration has been successfully finished, attach the calibration label to the pH meter.
- When the calibration is complete, clean the pH meter, store it safely, and record the calibration data for later use.
- Put the electrode inside the soaker bottle.
- Take out all of the buffer solutions, and then properly dispose of any used buffer solutions.
- Make sure the calibration area is tidy.
- Remove any maintenance tags from the device and de-isolate it.
- Make sure it is operating correctly before putting the pH meter back into use.
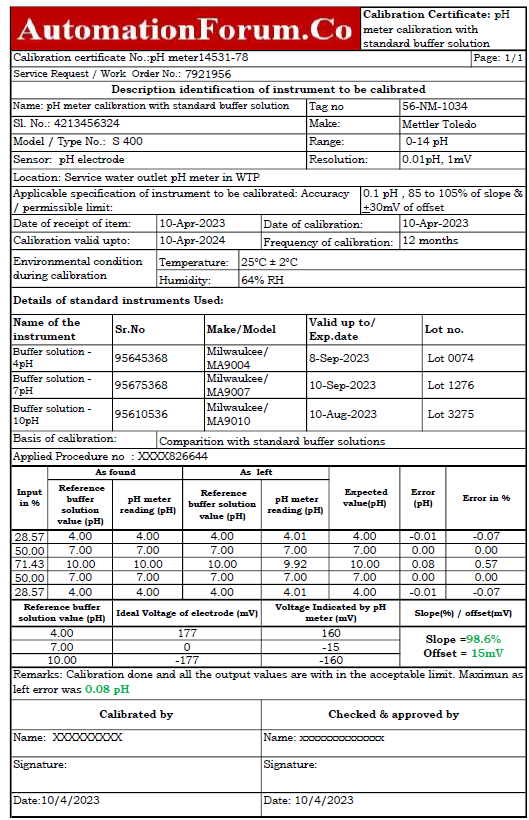
Sample pH meter calibration report
The following image demonstrates how the bench pH meter sample report of calibration was carried out in a lab using standard buffer solutions as the reference.
The link below allows you to download the Excel template that was used to create the pH meter calibration report.