- What is the fat in SCADA?
- Step 1. Pre-FAT Meeting
- Step 2. Documentation Review
- Step 3. Hardware Inspection
- Step 4. Software Installation & Configuration
- Step 5. Communication Test
- Step 6. I/O Testing
- Step 7. Graphics and HMI Verification
- Step 8. Alarm and Event Testing
- Step 9. Historical Data Verification
- Step 10. Redundancy Testing
- Step 11. Security Testing
- Step 12. System Performance Testing
- Step 13. Functional Testing
- Step 14. Final FAT Report
- Step 15. FAT Sign-Off
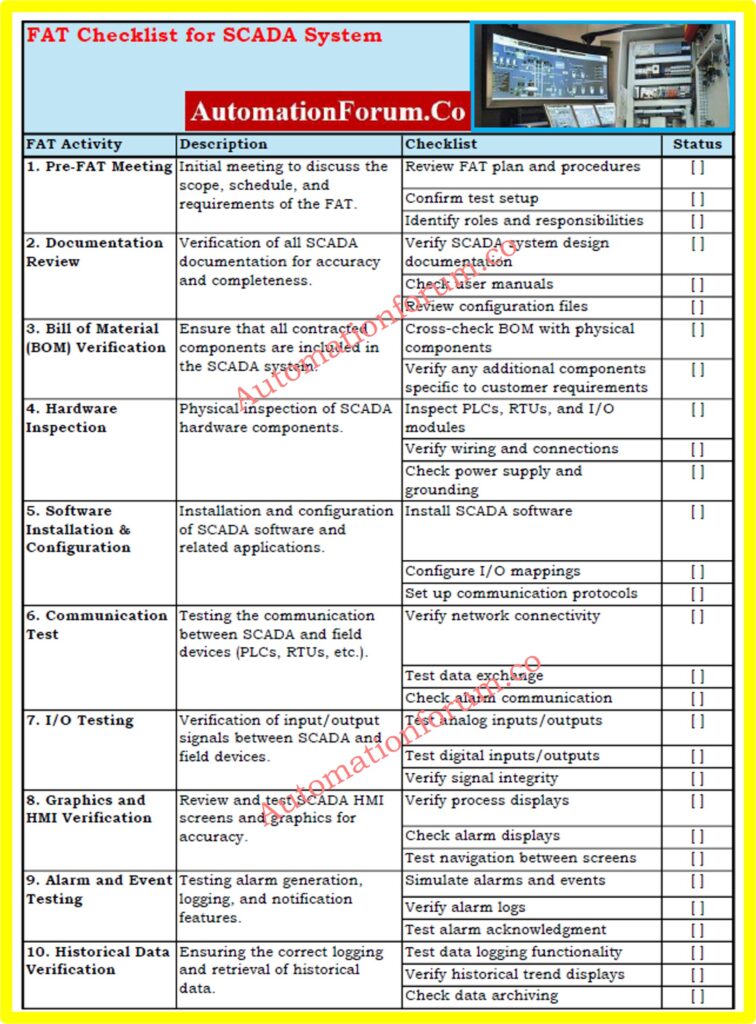
- Downloadable FAT Checklist for SCADA System
- When does the FAT occur in the project lifecycle for SCADA configuration and deployment?
- Why is it necessary for customers to witness the FAT?
- What does a SCADA system FAT cover?
- What role do EPCs play in the FAT process?
- Do asset owners have a role in the FAT?
The Factory Acceptance Test (FAT) for a SCADA (Supervisory Control and Data Acquisition) system is a critical step in ensuring that the system meets the required specifications and functions correctly before being deployed to the site.
What is the fat in SCADA?
Below is a step-by-step guide covering each FAT activity, along with a downloadable checklist.
Step 1. Pre-FAT Meeting
Align all stakeholders on the FAT scope, schedule, and roles.
- Begin by gathering all stakeholders for a comprehensive discussion on the Factory Acceptance Test (FAT).
- This meeting serves to align everyone’s understanding of the FAT scope, schedule, and individual roles. Review the FAT plan and procedures in detail to ensure that every aspect of the testing process is covered.
- It’s essential to confirm that the test setup is ready, including hardware, software, and network requirements.
- Additionally, clearly define and communicate the roles and responsibilities of all participants involved in the FAT to avoid any confusion later on.
Click here for Network Switches requirements in “SCADA” and “DCS” Architecture
Step 2. Documentation Review
Verify that all SCADA documentation is accurate and complete.
- Before beginning physical testing, ensure that all SCADA documentation is exact and comprehensive.
- This includes comparing the SCADA system design documentation to the project requirements to verify alignment.
- Make sure user instructions are easily accessible and up to date for reference.
- Furthermore, thoroughly analyze configuration files to ensure their accuracy and completeness, as any flaws here could cause serious problems during the testing phase.
Step 3. Hardware Inspection
Physically inspect SCADA hardware components to ensure they meet specifications.
- Next, physically inspect all SCADA hardware components.
- Ensure that they meet the required specifications and are free of flaws.
- This involves checking PLCs, RTUs, I/O modules, and other important hardware for physical damage.
- Check that all wiring and connections adhere to the design specifications, ensuring that the power supply and grounding are both adequate and in accordance with safety standards.
Click here for Different Types of SCADA System Architecture
Step 4. Software Installation & Configuration
Ensure the SCADA software is installed and configured correctly.
- Once the hardware is installed, go on to the software installation and configuration phase.
- Make that the SCADA software is properly installed on the relevant servers and workstations.
- To enable error-free information interchange between devices, carefully establish the I/O mappings in accordance with the system design and set up the relevant communication protocols, such as Modbus or OPC. This is an important step for the SCADA system to function properly.
Step 5. Communication Test
Verify the communication between SCADA and field devices.
- Testing communication between the SCADA system and field devices is an important stage.
- Begin by ensuring network communication between the SCADA, PLCs, and RTUs.
- Carry out tests to ensure that data interchange between SCADA and field devices is correct and timely.
- Additionally, ensure that alarm communication works properly, as any failure here could lead to operational concerns later on.
Step 6. I/O Testing
In this step, focus on ensuring that input/output signals are transmitted correctly between the SCADA system and field devices.
- Both analogue and digital signals should be tested to ensure adequate scale, responsiveness, and operation.
- It is critical to validate the integrity of all signals, ensuring that no loss or corruption occurs during transmission, which could affect system performance.
Step 7. Graphics and HMI Verification
Confirm that SCADA HMI screens and graphics are accurate and functional.
- This includes ensuring that process display screens accurately reflect real-time data, and that alarm displays are clear and accurate.
- Test the navigation between different HMI panels to ensure that it is user-friendly and intuitive, as this will affect the ease of operation for end users.
Step 8. Alarm and Event Testing
Test the SCADA system’s ability to generate, log, and notify alarms and events.
- Simulate a variety of alarm circumstances and events to evaluate the system’s response.
- Ensure that alarm logs are accurate and thorough, and that the alarm acknowledgement mechanism is working properly, allowing for proper recording and reaction to any issues that may develop during operation.
Step 9. Historical Data Verification
This step is crucial to ensure that the SCADA system logs and retrieves historical data accurately.
- To ensure the reliability of the data logging capabilities, test it over a specific time period.
- Check that historical trend displays accurately represent the logged data and that data preservation mechanisms work as intended, ensuring long-term data integrity.
Step 10. Redundancy Testing
Verify the SCADA system’s failover capabilities.
- Redundancy is key to system reliability, so verify the SCADA system’s failover capabilities.
- Redundancy is essential for system reliability, so test the SCADA system’s failover capabilities.
- Simulate server or network problems to test the system’s responsiveness.
- Confirm that the automatic failover occurs without any data loss, and validate data integrity after the failover to ensure that the system continues to run smoothly and consistently.
Step 11. Security Testing
Evaluate the SCADA system’s security features.
- Evaluate the SCADA system’s security features to ensure effective protection against unauthorized access.
- Test user access levels to ensure that authorisation controls are properly applied.
- To maintain system security, ensure that password protection is secure and keep an eye out for any unauthorized access attempts, which should be reported and treated properly.
Step 12. System Performance Testing
In this step assess the overall performance of the SCADA system under various conditions.
- To evaluate the system’s efficiency, test its response time under normal and peak load levels.
- Monitor CPU and memory consumption to ensure the system is running smoothly, and simulate peak load scenarios to assess the system’s robustness, ensuring it can manage high-demand conditions without degrading performance.
Step 13. Functional Testing
Conduct a thorough functional testing phase to ensure the SCADA system meets all operational requirements.
- Test the control logic to confirm it works as intended and that all interlocks are working properly.
- Simulate real-time processes to evaluate the system’s overall functioning and ensure that it works as expected in a live setting.
Step 14. Final FAT Report
Prepare and review the FAT report, documenting all test results and any issues.
- After testing is completed, create and analyse a full FAT report.
- This record should detail all test findings, any difficulties that arose, and how they were resolved.
- Compile all test data into a detailed report and share it with all stakeholders for approval.
- This report provides a formal record of the FAT procedure and its results.
Step 15. FAT Sign-Off
Obtain official sign-off on the FAT, confirming all tests have been completed successfully.
- Ensure that all relevant parties provide their signatures, indicating their agreement with the FAT results.
- Once signed off, finalize all documentation and prepare it for handover, marking the SCADA system as ready for shipment to the site.
Downloadable FAT Checklist for SCADA System
We have created a downloadable checklist in Excel format for easy tracking of FAT activities. This below checklist is ensuring that all aspects of the FAT process are covered systematically.

You can download it by clicking the link below:
FAQ ON SCADA System FAT
When does the FAT occur in the project lifecycle for SCADA configuration and deployment?
- The FAT takes place before the SCADA rack is shipped to the project site, such as a solar PV project.
- Conducting the FAT in-house allows the SCADA integrator to make necessary adjustments more efficiently.
- Site Acceptance Testing (SAT) is conducted later, once the system is installed in the field.
- Typically, FAT is scheduled about 30 days before the completion of the substation building, allowing time to address any issues and manage shipping logistics.
Why is it necessary for customers to witness the FAT?
- Witnessing the FAT allows customers to ensure the system meets their standards and to familiarize themselves with the system before it is implemented on-site.
- The FAT also provides an opportunity for a brief training session on the system’s functionality and benefits.
- Customers can choose to attend the FAT in person or virtually, and the reviewer could be the owner, a consultant, or a representative of the EPC contractor.
What does a SCADA system FAT cover?
A SCADA system FAT typically includes:
- Bill of Material (BOM) verification: Ensuring all contracted components are included.
- Hardware inspection: Verifying proper assembly and functionality of the hardware.
- Software inspection: Checking that the software is correctly installed and configured.
- Communication and connectivity verifications: Ensuring proper cabling and labeling.
- HMI functionality verifications: Verifying that HMI screens meet customer requirements.
- Functional logic verifications: Testing alarms, controls, and overall system functionality.
- General system functionality verifications: Confirming that all components work as intended.
Components tested usually include SCADA servers, network switches, PLCs, and communication devices, among others. Items not within the SCADA provider’s scope, such as customer historians or GPS time sync servers, are tested during the SAT.
What role do EPCs play in the FAT process?
- If the SCADA rack is built at a different location than the SCADA integrator’s facility, the EPC contractor is responsible for conducting the FAT and ensuring the integrator has access to the equipment for programming.
- The EPC’s role is crucial, as performing a thorough FAT in-house makes system adjustments easier, leading to smoother and faster commissioning in the field.
Do asset owners have a role in the FAT?
- Asset owners may be involved in the FAT, especially if they are brought into the project early.
- Their involvement ensures that the system meets long-term operational needs, as they will manage the plant for its entire lifecycle, typically 25 years or more.
Click here for Best 12 free SCADA software


