- Case Summary: Control Valve Passing After Overhaul
- Understanding Control Valve Passing
- Root Cause Exploration: What Could Have Gone Wrong?
- Site-Level Observations: The Hidden Issue Emerges
- Root Cause Identified: In-Line Auto-Calibration Error
- Final Resolution: Step-by-Step Recovery
- How to Prevent Control Valve Passing After Overhauling
- Other Common Mistakes that Lead to Passing Issues after Overhauling
- Additional Preventive Tips for Long-Term Reliability
- Key Takeaway: Field Conditions Often Override Workshop Results
- Why Root Cause Analysis Important in Control Valve Failures ?
- FAQ on Control valve Passing
- How to check control valve passing?
- What is the common problem in a control valve?
- How to prevent valve passing?
- What is the problem with valve passing?
- Test Your Expertise in Temperature Control Loop Troubleshooting
In this detailed guide, we explain how to troubleshoot a control valve passing problem after overhauling, using a real-world case involving a globe valve in a dirty water application. You will learn about the technical checks, probable causes, and most importantly, how to prevent control valve leakage after service jobs through precise procedures.
Fixing a Stuck Control Valve – Step-by-Step Guide: How to do maintenance on struck control valve?
Case Summary: Control Valve Passing After Overhaul
A globe-type control valve, operated with a diaphragm actuator (air-to-close), was used in a dirty water service line. Due to noticeable internal leakage, the maintenance team planned a complete overhaul, which included:
- Dismantling and replacing all hard parts (plug, seat, etc.)
- Replacing soft parts in the actuator
- Auto-calibration using a digital valve positioner
- Stroke testing and Class IV leakage testing at the workshop
Post-workshop, the valve was reinstalled at a different location and taken online. Despite successful test results in the workshop, passing was observed immediately after re-commissioning.
How to Classify Seat Leakage in Control Valves: Seat Leakage Problem Classification of Control Valve
Understanding Control Valve Passing
Unwanted fluid leaking through the valve seat and plug when the valve is closed is referred to technically as a passing control valve. One possible cause of this is mechanical damage (worn seat or plug). This could be due to:
- Mechanical damage (worn seat or plug).
- Failure of the actuator (inadequate closing force)
- The valve assumes a full stroke at 50% closure, which is a calibration issue.
- Between the plug and the seat, there is foreign material.
Such leakage can result in major problems in regulated process loops, such as inadequate control or malfunctioning safety interlocks.
Refer the below link for the Control Valve Leakage: Types, Testing & Standards
Root Cause Exploration: What Could Have Gone Wrong?
Cause 1: Seat or Plug Damage
After almost ten years of use, the valve was overhauled. However, new hard parts were fitted during overhauling. Class IV leakage tests conducted after calibration revealed no obvious leaks. Therefore, mechanical damage was not likely to be the problem.
Top Accessories Every Control Valve Must Have: Essential Control Valve Accessories for Reliable Process Control
Cause 2: Actuator Air Leak or Malfunction
The diaphragm actuator’s soft components were changed. During leak testing, no passage was seen from the actuator port, and the datasheet’s stated air supply pressure was confirmed. Actuator problems were excluded.
Cause 3: Incomplete Calibration
Auto-calibration was used for calibration in the workshop, and stroke verification at the bench was successful. However, field behavior is not always reflected in workshop calibration, particularly in services that include polluted fluid or strong backpressure.
Cause 4: Damage During Transport
Using lifting equipment and avoiding sudden shocks, the valve was moved with caution and under observation. There was little chance of mechanical misalignment due to transport.
Cause 5: Air Supply Problem in the Field
After installation, the actuator’s air pressure was checked once again. Pressure was in line with the design specifications. Consequently, the cause was not actuator underperformance brought on by a lack of air.
Site-Level Observations: The Hidden Issue Emerges
The valve was brought offline for a second inspection when it was observed to be passing once more. This time, a crucial disparity was found: even though the controller required complete closure, the plug remained slightly raised since the valve stroke in the field was less than 100%.
Because of this incomplete stroke, the plug was never completely seated, allowing flow to continuously leak through; as a result, the control valve was “passing.”
Key Realization
Although calibration and leakage testing were successful at the workshop, the field conditions were different. Something had affected the valve’s travel after installation.
Root Cause Identified: In-Line Auto-Calibration Error
Upon questioning the site engineer and technician, the following sequence came to light:
- After installation, the control valve showed 2%–3% hunting during operation.
- Thinking it was a calibration issue, the engineer performed a second auto-calibration while the valve was still online.
- This was done without isolating the process line.
Since the valve was in a dirty water service, particles present in the line likely entered the seat area during calibration.
As a result:
- Consequently, the movement of the valve plug was limited by these foreign particles.
- This limited stroke was mistakenly recognized by auto-calibration as the entire stroke.
- Although the valve was technically still slightly open, the controller believed it was closing completely.
- Uncontrolled leakage returned after the particles gradually drained downstream, creating a space between the seat and stopper.
Top Causes Behind Control Valve Hunting Issues: What are the main causes of control valve hunting?
Final Resolution: Step-by-Step Recovery
The issue was resolved through a systematic process:
Step 1: Isolate the Line
Prevent more contaminants from entering the valve by isolating it from the process.
Step 2: Flush the Line
Clean water flushing was done to remove residual dirt and prevent further contamination.
Step 3: Offline Calibration
With pure air and no process interference, the valve was auto-calibrated once more.
Step 4: Stroke Verification
Physical measurements of the stroke length were made and compared to the valve datasheet’s design specifications.
Step 5: Online Re-commissioning
The valve was brought back online once a tight shutdown and complete stroke were confirmed. Even when the design pressure was at 100%, no passing was seen.
How to Prevent Control Valve Passing After Overhauling
Several important lessons for field personnel and engineers are highlighted by this real-world example:
Always Verify Stroke Length Against Datasheet
To verify real movement, use an actuator travel indication or stroke scaleDon’t rely solely on the positioner feedback.
Never Calibrate Inline in Dirty or Wet Services
Always isolate the valve from the line before performing any calibration. Solid particles can cause false calibration data.
Flush the Line Before Valve Installation
Even new pipelines can carry welding debris, scale, or rust. Flush thoroughly with clean water or air before putting any valve into service.
Use a Field Commissioning Checklist
Standardize your control valve commissioning with a checklist including:
- Air pressure verification
- Offline calibration
- Stroke and seat leak test
- Signal feedback check
- Loop tuning validation
Train Personnel on Valve Automation Behavior
Auto-calibration routines are helpful but not fail-proof. Reliable control requires an understanding of the actuator’s behavior in actual fluid conditions.
Other Common Mistakes that Lead to Passing Issues after Overhauling
Although earlier parts concentrated on a particular underlying reason, the following other real-world situations frequently result in control valve passage following overhaul:
Improper Actuator Mounting
Incomplete closure may result from even a small misalignment between the actuator stem and valve stem. If the actuator linkage is not centered or tightened to spec, the actuator may not transmit full travel force to the plug causing a control valve to pass under load.
Misconfigured Positioner Settings
Digital valve positioners can store multiple configuration parameters like travel span, signal range, zero calibration, and fail-safe actions. If the configuration file used during re-installation is incorrect, it may command incorrect stem travel. This is especially critical for split-range or non-standard signal setups.
Key Performance Parameters You Must Know: Essential Control Valve Performance Parameters
Incorrect Air Tubing or Signal Reversal
A simple tubing swap between supply and control signal lines can reverse the actuator logic (air-to-close becoming air-to-open). In such a case, the valve may remain partially or fully open even when commanded to close mistakenly seen as a passing issue.
Why Valve Positioners Improve Control Accuracy: Why You Should Use Control Valve Positioners?
Improper Bench Testing Conditions
Some teams test control valves at atmospheric pressure conditions, which doesn’t replicate the actual system pressure or media. Because of fluid viscosity and thermal expansion, a valve that passes a leaking test on a test rig may leak when exposed to actual differential pressure or fluid temperature.
Understanding the Importance of Bench Set in Actuators: Why is Control Valve Actuator Bench Set Important ?
Additional Preventive Tips for Long-Term Reliability
After valve overhauling, adhere to these expert-recommended procedures to improve dependability and lower reoccurring problems:
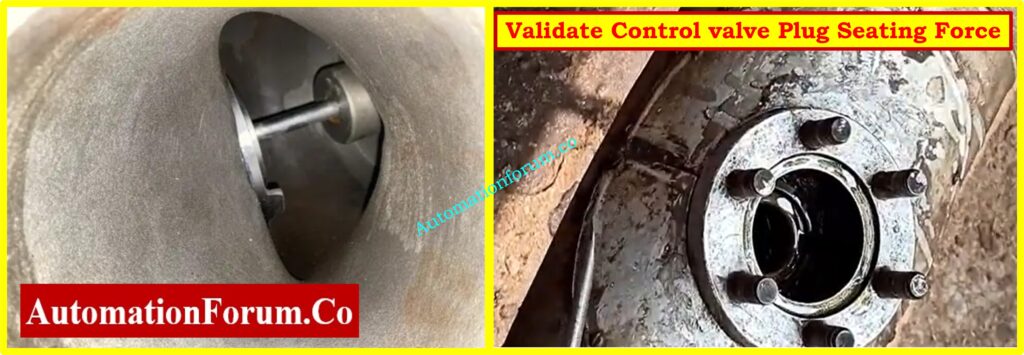
Validate Plug Seating Force
Check the actuator force at shutoff in addition to the stroke length during calibration. For certain applications to satisfy Class IV or V leakage requirements, a strong sitting force is required. To make sure there is enough closure pressure, use an actuator torque specification or force gauge.
PM Checklist: Keep Control Valves Running Smoothly: PM Maintenance checklist for Control valve Troubleshooting
Match Seat Material to Service Fluid
Choosing the right seat and plug material is very important in dirty, rough, or corrosive services. For long life and a tight shutdown, you could need stainless steel, hardened trim, or ceramic inserts. After an overhaul, trim material that doesn’t match can wear out soon and cause immediate passing.
Consider Positioner with Travel Feedback Alerts
Implement Commissioning Reports and Documentation
Always record down the valve configuration settings, the dates of calibration, the checks of air pressure, and any problems you see. A clear trail of commissioning data makes it easier to find problems and prevent guesswork.
Complete Preventive Maintenance Guide for Control Valves: Control Valve Preventive Maintenance procedure for Control Valve
Key Takeaway: Field Conditions Often Override Workshop Results
Control valves work in changing conditions, notably in utilities and wastewater processes where foreign particles, pressure spikes, and dirty media are typical. Overhaul workshops are great for rebuilding and calibrating since they are clean and regulated, but they don’t always look like the real line circumstances.
How to Size Control Valves the Right Way: How to Properly Size Control Valves for Maximum Efficiency?
Why Root Cause Analysis Important in Control Valve Failures ?
Control valve passing problems after overhauling are not always caused by mechanical failure or installation errors. In this case, a simple auto-calibration at the wrong time and condition triggered the entire issue.
If you have a control valve that is passing, you need to do more than simply look at the valve itself; you need to take a more general approach. Every part of the valve loop must be checked, from how it works and how it is set up to how it is contaminated and how it is calibrated.
This scenario shows how important it is not to jump to conclusions regarding broken parts or damaged actuators. Instead, systematic diagnostics, isolating field influences, and careful commissioning can save your control valves from needing extra maintenance cycles and make sure they work as they should after an overhaul.
By applying root cause analysis and verifying calibration, stroke, and process cleanliness, the engineering team avoided unnecessary rework and restored proper functionality.
Refer the below link for the Control Valve Calibration Procedures
FAQ on Control valve Passing
How to check control valve passing?
There are ways to find control valve passing, such as acoustic monitoring, which uses ultrasonic sensors to pick up the sound of a leak, and infrared thermography, which shows temperature changes produced by fluid moving through a closed valve. Another way to find irregular flow is to evaluate the pressure and flow downstream while the valve is closed. During shutdowns, checking the seat and plug by hand is a straightforward way to make sure there is a leak.
What is the common problem in a control valve?
Internal leakage is a typical problem with control valves. This can happen when the seat or plug wears down, the actuator doesn’t work right, or the valve is misaligned. If there is debris stuck in the valve, it may not close all the way. Depending on the valve class, small leaks are okay. However, too much leakage affects control performance and usually means that the valve has to be fixed or recalibrated.
Harsh Process? Best Control Valve Selection Practices: Control Valve Selection and Recommended Practices for Harsh Process Conditions
How to prevent valve passing?
Routine checks, oiling moving parts, and cleaning to get rid of dirt are all ways to stop valve passage. When you do maintenance, it’s vital to replace worn seats and seals. Regular checks of the actuator stroke and calibration assist make sure the valve closes all the way. Using positioners and monitoring tools can also assist find problems before they get worse.
What is the problem with valve passing?
Passing a valve can make a process unstable, waste energy, and put people in danger. Common results include bad control, pollution, and damage to equipment downstream. Worn sealing surfaces, debris, and broken actuators are some of the things that can cause this. Taking care of these problems during regular maintenance helps make sure that the system works well and is reliable.
Test Your Expertise in Temperature Control Loop Troubleshooting
Refer the below link for Testing Your knowledge in Temperature Control Loop Troubleshooting