Table of Contents
- What are five-point calibrations?
- Static error:
- Dynamic Error:
- What are measurement lag and fidelity?
- Basics of Instrument Calibration:
- What are the basic steps involved in instrument calibration?
- What Steps are involved in a Five Point Calibration of an instrument?
- Generation of Five Point Instrument Calibration:
- How to perform 5 point calibration in a pH meter?
- Displacer Level Transmitter 5-point calibration:
What are five-point calibrations?
- During the calibration of an instrument, the data points for that instrument must be considered as 0%, 25%, 50%, 75%, and 100%, of the range value.
- During a five-point calibration, testing of both upscale and downscale must be performed to determine repeatability and hysteresis of the calibrating instrument.
- In a five-point calibration, Lower Range Value is 0% and the Upper range value is 100%

Every measurement system has several types of measurement errors such as
Static error:
- The difference between the measured value and the actual value of the quantity is known as a static error.
- For a measuring instrument an actual value is quite difficult to obtain, so an approximate value is considered a true or actual value.
- These errors are caused by restrictions of measuring instruments or physical laws ruling its actions.
- The instrument may be considered accurate if its measured value is nearly equal to its true value.
Dynamic Error:
- The difference between the true value of a quantity varying with respect to time, and the reading indicated by measuring instrument without assuming any static error.
- These errors are caused by the instrument which responds slowly to follow changes in the measured variables.
- For example when a room thermometer doesn’t indicate accurate temperature until the temperature reaches a steady value.
- The net or total dynamic error of an instrument is
- The combination of measurement lag and its fidelity.
- Change in phase of system input and output conditions.
What are measurement lag and fidelity?
- Measurement lag: If an instrument doesn’t respond to an immediate change in input and the delay in instrument response for a change in the measured variable.
- Fidelity: the capacity of the system to duplicate the output in the same form as the input.The grade at which the measurement system displays changes in the measured variable without any dynamic error.
- Random error: The variation of the total error from its mean value. These errors may not be easily created and are caused by random alterations in the system under steady-state conditions.
Basics of Instrument Calibration:
- Calibration is a process of discovering the output condition of an instrument being used for a particular time period.
- Calibration of an instrument is achieved by measuring and comparing the indicated values against a standard set of reference values and making necessary adjustments if required to confirm for highest accuracy specified by the manufacturer.
- An instrument is said to be calibrated if the measured value becomes equal to or lies very close to the standard set of the reference value.
What are the basic steps involved in instrument calibration?
The four basic steps involved in instrument calibration.
- Feed Standard values to the measuring instrument as a standard input reference.
- Measure value from the instrument using certified measurement device like multimeter.
- Complete the verification using calibration tables for the lower and higher value.
- Calculate the error on the output signal and comparing the obtained result with predicted accuracy.
During the calibration of an instrument:
- An adjustment is not required and is not mandatory iftheerror and expected accuracy are the same. But, we need to verify the accuracy of the instrument

- An adjustment is required to be done to minimize or to eliminate error if the error is higher than expected accuracy

What Steps are involved in a Five Point Calibration of an instrument?
Steps involved in a Five Point Calibration include
- Zero Adjustments at Lower Range Value
- Span Adjustments at Upper Range Value
- Linearity Adjustments at 25%, 50% & 75% values.
Generation of Five Point Instrument Calibration:
Generating five-point values for the field instrument
- If theUpper Range Value of the process variable is 20mA as 100%
- If the Lower Range Value of the process variable is 4mA as 0%
| Span in % | Output in mA | |
|---|---|---|
| LRV | 0 | 4 |
| 25 | 8 | |
| 50 | 12 | |
| 75 | 16 | |
| URV | 100 | 20 |
How to perform 5 point calibration in a pH meter?
The five-point calibration in the pH meter is done by using standard buffers of pH 1.68, 5.01/5.00, 7.00/7.01, 10.00/10.01,and 12.45.pH electrode must be dipped into the calibration buffer. And the electrode end must be completely immersed inside the sample.
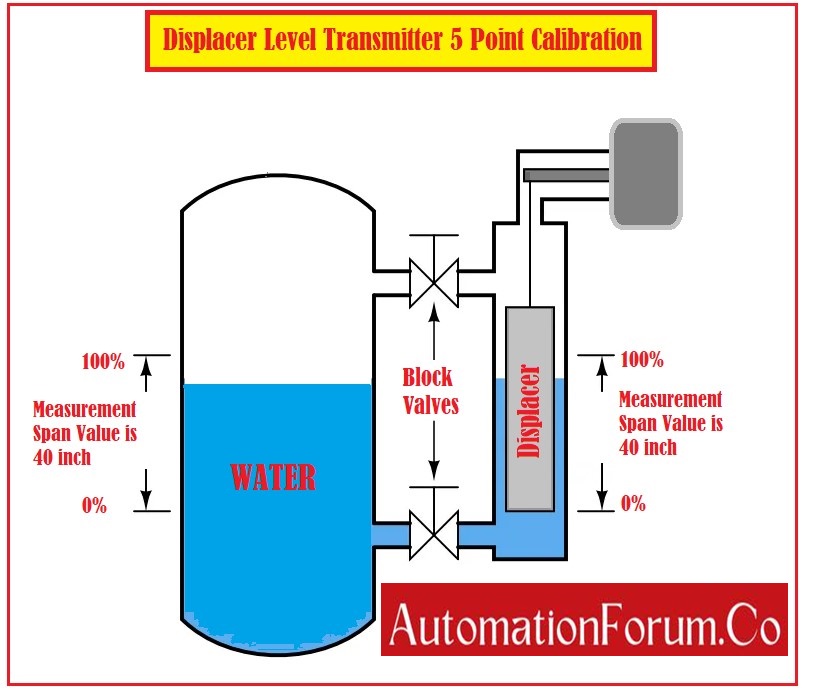
Displacer Level Transmitter 5-point calibration:

- Calculation of a basic 5-point (0%, 25%, 50%, 75%, and 100%) calibration table for the displacer level transmitter.
- Consider a cylindrical displacer of 15 pounds with a diameter of 2 inches.
- Water is used as a process fluid.
- The process liquid level low (LRV) is 0% at the bottom of the displacer
- Consider an electronic level transmitter with an output range of 4 to 20 mA
| Process level in inches | Span in % | Buoyant force in lb | Output Signal in mA |
|---|---|---|---|
| 0 | 0 | 0 | 4 |
| 10 | 25 | 1.135 | 8 |
| 20 | 50 | 2.270 | 12 |
| 30 | 75 | 3.405 | 16 |
| 40 | 100 | 4.540 | 20 |


