- Safety Precautions
- Follow the Isolation Procedure
- Obtain the Work Permit
- Prepare the Required Test Pressure Equipment
- Required Drawings and Project Documents
- Test Medium for Pressure Testing
- Testing Pressure Guidelines
- Checks to be Carried out Before Starting Pressure Test
- Impulse Line Testing Procedure
- Post Testing Procedure
- Final Checks to be Carried Out
- Completion of Impulse line Pressure Testing
- Summary in Sequence of Activities
- General Tips to carryout Impulse line Pressure Test and leak Test
- Test Sequence Checklist for Pressure and Leak Test of Instrument Tubing and Impulse Lines
- What is the purpose of the pressure impulse test?
Safety Precautions
- Ensure all personnel wear appropriate PPE, including gloves, safety glasses, and protective clothing.
- Barricade the testing area to restrict access to authorized personnel only.
- Ensure a fire extinguisher is available on-site.
- In the event of an emergency alarm, stop work and make all machinery and equipment safe.
- Conduct daily tool box talks to brief personnel on safety procedures and job hazards.
- Ensure that personnel have access to drinking water and are aware of heat stress symptoms.
Follow the Isolation Procedure
- Identify and isolate all relevant points in the process to prevent accidental exposure to process pressure.
- Implement LOTO procedures to ensure all isolated points are securely locked and tagged.
- Verify that isolation is effective by checking that there is no residual pressure in the lines before starting the test.
Obtain the Work Permit
- Ensure that all necessary work permits are obtained and validated before starting any work.
- Verify that permits are up to date and authorized by the responsible personnel.
- Ensure all activities comply with the conditions outlined in the work permit.
Prepare the Required Test Pressure Equipment
- Test Gauge: Calibrated to +/- 1% accuracy, with valid calibration stickers.
- Hydro Manual Pump: For pressurizing the lines.
- Hose: For connecting the pump and gauge.
- Hand Tools: For connecting and disconnecting fittings.
- Nitrogen Cylinder: For pneumatic testing.
- Pressure Gauge: Suitable for accurate measurement of test pressures.
- Standard Fittings: Required for connections of equipments.
- Spill Control Kits: Readily available and ensure personnel are trained in their use.
The above list ensures that all necessary equipment is included for both hydrostatic and pneumatic pressure testing.
Required Drawings and Project Documents
- Hook-Up Drawings: Review control valve hookup drawings and ensure they are up to date.
- P&ID (Piping and Instrumentation Diagrams): Verify that P&IDs are current and reflect the actual installation.
- Instrument Data Sheets: Ensure all instrument data sheets are available and reviewed for specifications.
- Calibration Certificates: Ensure calibration certificates for test gauges and instruments are valid and up to date.
Test Medium for Pressure Testing
Clean Water
- Employed for hydrostatic testing.
- Provides a non-compressible medium that helps in detecting leaks and assessing the integrity of the system under test. The water should be free of contaminants to prevent corrosion or damage to the system.
- Ensure the water temperature is within the required range to prevent any influence on the material properties during testing.
Air
- Used for pneumatic testing.
- Air is often chosen for low-pressure tests where a rapid response and minimal cleanup are needed. It allows for quick pressurization and depressurization.
- Safety is crucial when using air due to its compressible nature, which can be hazardous in case of failure.
Nitrogen
- Preferred for pneumatic testing, especially in high-pressure applications.
- Nitrogen is an inert gas, reducing the risk of fire or explosion, making it safer for pressure testing in environments where combustible gases or materials may be present.
- Ensure proper ventilation and monitoring of oxygen levels when using nitrogen in enclosed spaces to avoid asphyxiation risks.
- These test mediums are selected based on the nature of the system being tested and the safety considerations specific to the application.
Testing Pressure Guidelines
Hydrostatic Test
- The test pressure should be 1.5 times the maximum working pressure of the system.
- This higher pressure ensures the system can withstand operational pressures without leaks or failures, providing a safety margin for long-term durability.
Pneumatic Test
- The test pressure should be 1.1 times the maximum working pressure.
- The slightly elevated pressure tests the system’s integrity while considering the higher risk associated with testing with compressible gasses, such as air or nitrogen.
Checks to be Carried out Before Starting Pressure Test
- Ensure all ferrules are correctly installed and securely tightened to prevent leaks during the test.
- Verify that impulse lines are properly supported, with the correct slope maintained to avoid trapping air or fluids, which could affect the accuracy of the test.
- Ensure that all connected instruments are isolated to protect them from potential damage during the pressure test.
- Barricade the testing area for the hydro test, restricting access to authorized personnel only to ensure safety.
- Ensure all personnel involved in the testing process are using the required safety PPE (Personal Protective Equipment), including gloves, safety glasses, helmets, and any other necessary gear.

Impulse Line Testing Procedure
Preparation
- Verify the completeness of all applicable records, including pressure test documentation and inspection reports, before clearing the line for the pressure test.
- Avoid air pockets by leaving vents at high points open until the clean test medium flows from the outlet. This ensures the line is fully purged of air and filled with the test medium.
- Discuss all personnel involved on safety measures and testing procedures. Ensure they understand the risks and the steps to take in case of an emergency.
Pressurization
- Connect the pressure source (e.g., hydro pump or nitrogen cylinder) to one end of the impulse line and attach a calibrated pressure gauge to the other end to monitor pressure levels.
- Gradually apply pressure to the specified test pressure, avoiding sudden pressure spikes that could damage the line or compromise the test.
- Continuously monitor the impulse line for any signs of leaks. If leaks are observed, mark their locations for further inspection.
Leak Detection
- Apply a soap solution or leak detection fluid along the impulse line to identify leaks, indicated by the formation of bubbles at leak points.
- If leaks are detected, depressurize the line safely and ensure it is properly drained before initiating any repairs. This prevents accidental pressurization during the repair process.
- Perform the necessary repairs on the impulse line, ensuring that all fittings and connections are secure. Re-pressurize the line for testing again, and document the results to maintain accurate records.
Post Testing Procedure
Depressurization
- Depressurize the line in a controlled manner, avoiding the immediate release of pressure to prevent potential hazards such as sudden equipment movement or injury.
- Gradually reduce the pressure until it reaches a safe level before fully venting.
Draining
- After testing, drain the lines completely to remove the test medium.
- Follow up with an air flush to ensure all residual fluids are cleared, preventing corrosion or contamination in the line when it returns to service.
Final Checks to be Carried Out
- Clean all tubes and lines using compressed air to remove any debris, dust, or residual test medium.
- This ensures the system is free from contaminants and ready for service.
- Ensure all connections, fittings, and flanges are properly reconnected and securely tightened.
- Double-check that no connections have been left loose or improperly sealed.
- Verify that all valves and instruments are operating correctly.
- This includes checking for smooth operation, correct readings, and ensuring that there are no abnormal noises or indications of malfunction.
Completion of Impulse line Pressure Testing
- Verify that all isolation points are de-isolated and that normal process conditions are restored.
- Remove all lockout/tagout devices, ensuring that they are accounted for and that the area is safe for operation.
- Ensure all systems and instruments are reconnected and operational.
- Ensure that the work permit is signed off by the responsible personnel and officially closed.
- Ensure that the testing area is thoroughly cleaned, removing any debris, tools, and equipment.
- Restore the area to its original condition, ensuring that it is safe and free from hazards.
- Conduct a final inspection to ensure that all testing activities have been completed satisfactorily.
- Document all observations made during the testing process, including any issues encountered and how they were resolved.
- Review the observation report with the project team and ensure that any lessons learned are incorporated into future procedures.
- Communicate the results and any important findings to relevant stakeholders, including management and safety personnel.
Summary in Sequence of Activities
- Disconnect each tube at both ends for flushing and testing.
- After flushing with dry air, blank off one end and connect the other end to a nitrogen cylinder with a test gauge.
- Pressurize the line to 1.5 times its maximum working pressure.
- Isolate the line from the pressure source and observe for any pressure drop over 5 minutes. If a pressure drop is observed, mark the leaks and release the pressure.
- Thoroughly blow through all lines tested with dry air/nitrogen before reconnecting.
- Reconnect the instrument lines to the instrument manifold and check all related valves for correct operation.
General Tips to carryout Impulse line Pressure Test and leak Test
- All activities should be closely supervised by a designated, authorized work leader.
- Ensure all personnel are familiar with emergency procedures and evacuation routes.
- Maintain clear and effective communication among all team members throughout the testing process.
- Coordinate any interfacing works at the site to avoid conflicts and ensure safety.
- Record all test parameters, observations, and results in the maintenance records or calibration management system.
- Ensure proper disposal of any waste materials and minimize environmental impact.
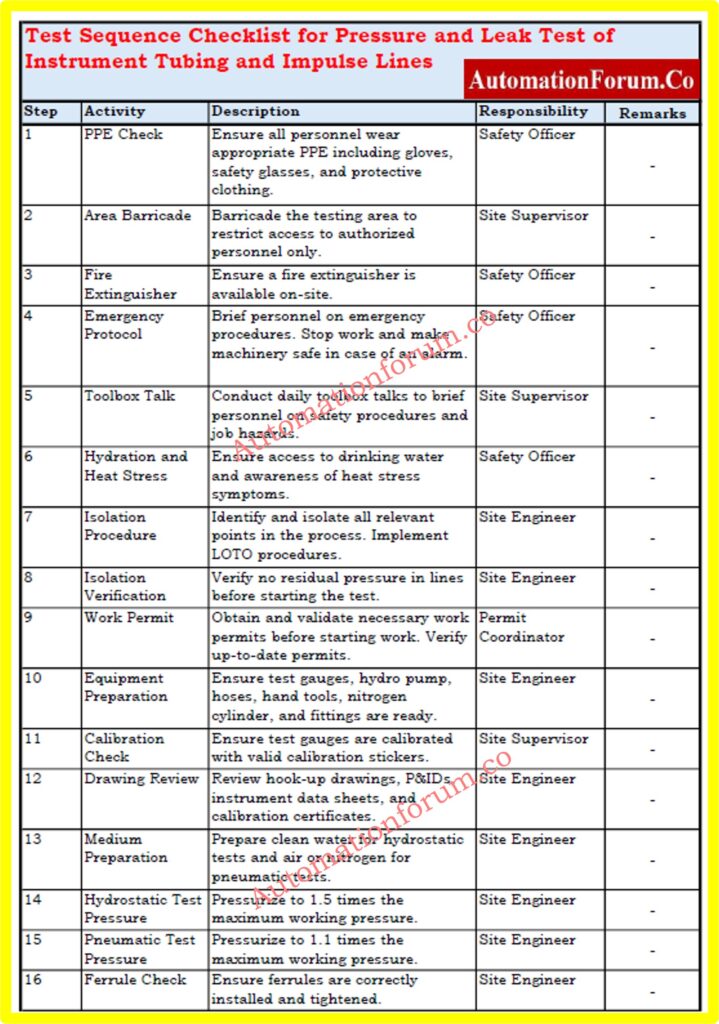
Test Sequence Checklist for Pressure and Leak Test of Instrument Tubing and Impulse Lines
The below excel sheet provides a clear sequence of activities required for the pressure and leak test of instrument tubing and impulse lines, ensuring all necessary steps and safety measures are followed.

Refer the below link for the downloadable excel form of the Test Sequence Checklist for Pressure and Leak Test of Instrument Tubing and Impulse Lines
What is the purpose of the pressure impulse test?
The pressure impulse test assesses the durability and reliability of pressure components by subjecting them to repeated pressure cycles. It simulates operational stress to identify potential weaknesses, ensuring components can withstand fluctuating pressures and maintain safety and integrity over time.


