- Why Pressure Gauge Calibration is Important
- 7 Steps Calibration Procedure for Pressure Gauge
- Step 1: Tools Required for Pressure Gauge Calibration
- Step 2: Safety Precautions Before Calibration
- Step 3 : Preparing the Calibration Setup
- Step 4 : Calibration of Pressure Gauge
- Step 5: Recording Calibration Results
- Step 6: Completion of Calibration
- Step 7: Calibration Report Preparation
- Traceability in Pressure Gauge Calibration
- Calibration Standards and Regulations
- Calibration Interval and Maintenance Guidelines
- Calibration Acceptance Criteria
- Common Pressure Gauge Calibration Mistakes
- FAQs on Pressure Gauge Calibration
What is a Pressure Gauge?
A self-contained indication that converts the measured process pressure into the mechanical motion of a pointer is what is frequently represented by the word “pressure gauge.”
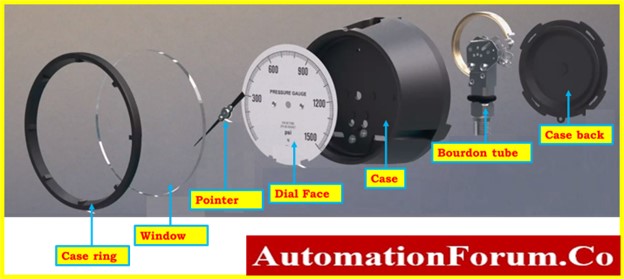
An instrument for measuring the pressure of a fluid or gas in a system is a pressure gauge. Typically, it comprises of a circular dial with a moving needle or pointer that responds to changes in pressure and a device that converts those changes in pressure into movement of the needle.
Monitoring the pressure in pipes, boilers, tanks, and other pieces of equipment are just a few of the many industrial, commercial, and domestic applications where pressure gauges are often utilised.
Types of Pressure Gauges
The following are a few of the pressure gauges that are most popular:
- A curved tube is used in a Bourdon tube gauge, which expands or contracts when pressure varies, causing the needle to move.
- A flexible diaphragm is used in a diaphragm gauge, which moves in reaction to variations in pressure.
- A flexible metal bellows is used in bellows gauges, which expand or contract in response to variations in pressure.
- Digital gauge: This kind of gauge measures pressure using electronic sensors and shows the findings on a digital screen.
Why Pressure Gauge Calibration is Important
Calibration of pressure gauges is necessary to provide accurate readings, keep processes safe, follow standards, lower the chance of equipment failures, and make industrial operations more reliable, which keeps costs down and safety concerns low.
How do you Calibrate a Pressure Gauge?
7 Steps Calibration Procedure for Pressure Gauge
This procedure provides a thorough explanation of how to calibrate a pressure gauge in the workshop using comparator.
Step 1: Tools Required for Pressure Gauge Calibration
The tools needed to calibrate a pressure gauge will depend on the setup and method used to calibrate it. But here are some general tools that are often used to calibrate pressure gauges:
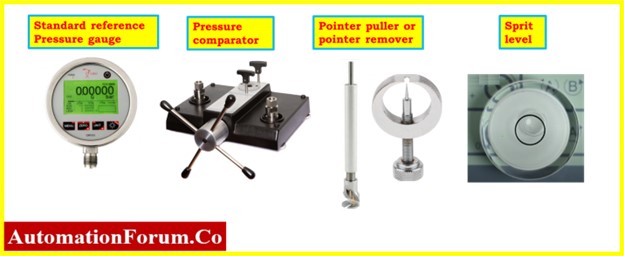
- Reference standard digital pressure gauge.
- Pressure comparator.
- Mineral oil for comparator.
- Sprit level.
- Pointer puller or pointer remover.
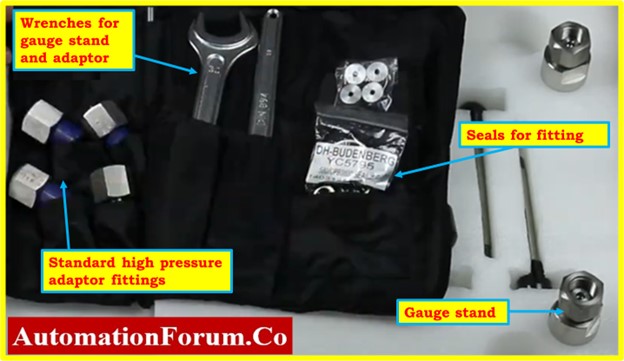
- Necessary hand tools.
- Standard adaptor fittings with seals.
- Soft Cloth for cleaning.
Step 2: Safety Precautions Before Calibration
- Please click on the link below for details on process industry calibration procedures, general safety precautions, and basic safety information – Basic Safety and General Considerations for Process Industries Calibration Process
- Locate the pressure gauge you want to remove. Check to make sure it’s the right converter, and record any pertinent information Tag number (e.g., the manufacturer, model number, pressure range, etc.).
- Depending on the kind of system, you may need to depressurize it before detaching the pressure gauge. Use the right procedures to depressurize the system (e.g., vent the pressure or isolate the system).
- Stop the process and release any pressure or fluid that may be present in the system before disconnecting the pressure gauge.
- Use the built-in valve or bleed port on the pressure gauge to gradually release pressure. This will help in avoiding sudden pressure releases that can result in harm.
- Carefully remove the tubing connections from the pressure gauge. Observe all necessary safety procedures, such as wearing insulated gloves or other protective gear, and take care not to damage the tubing or fittings.
- The process tapping has to be quickly caped or sealed once the gauge is disconnected to stop any fluid or gas from escaping.
- To stop the pressure gauge from dropping or causing any risks, secure it. Any protective coverings, brackets, or hardware that were taken off during installation may need to be placed back on.
- Mark or tag the disconnected gauge with the necessary details, including the time, the cause of removal, and any other relevant information. This will help keep the gauge from being confused or misidentified in the future.
- Follow all relevant lockout/tagout procedures to prevent an unintended start. Make sure the pressure gauge is completely separated from the process.
Step 3 : Preparing the Calibration Setup
- To calibrate a pressure gauge, you need a setup that makes sure the process is accurate and consistent.
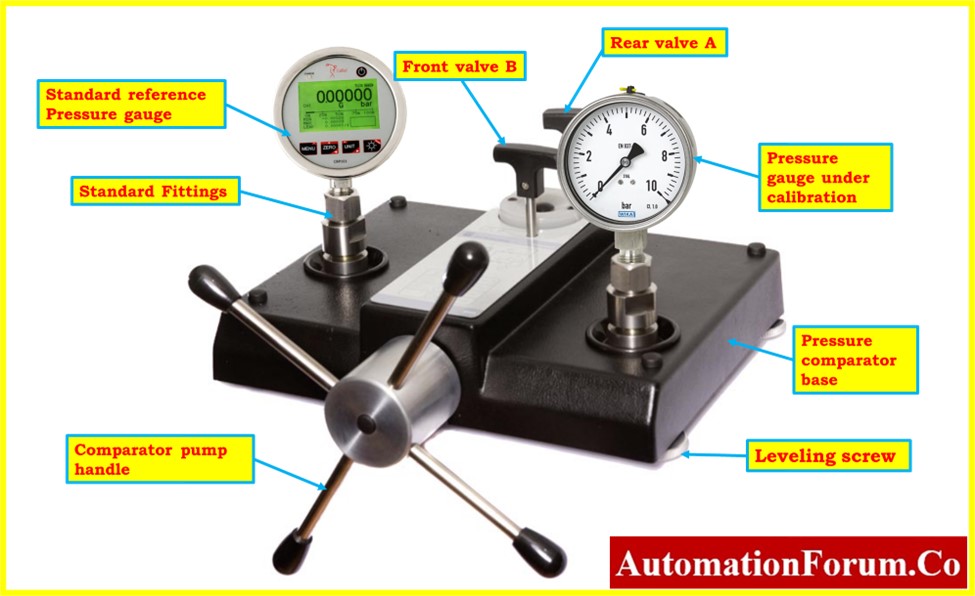
- Choose a reference standard that will be suitable for the calibration. This could be a pressure comparator, calibrator and another gauge whose accuracy is known.
- The reference standard pressure gauge should be correct for the range of the gauge being calibrated and also it should be 10 times more accurate than the pressure gauge under calibration.
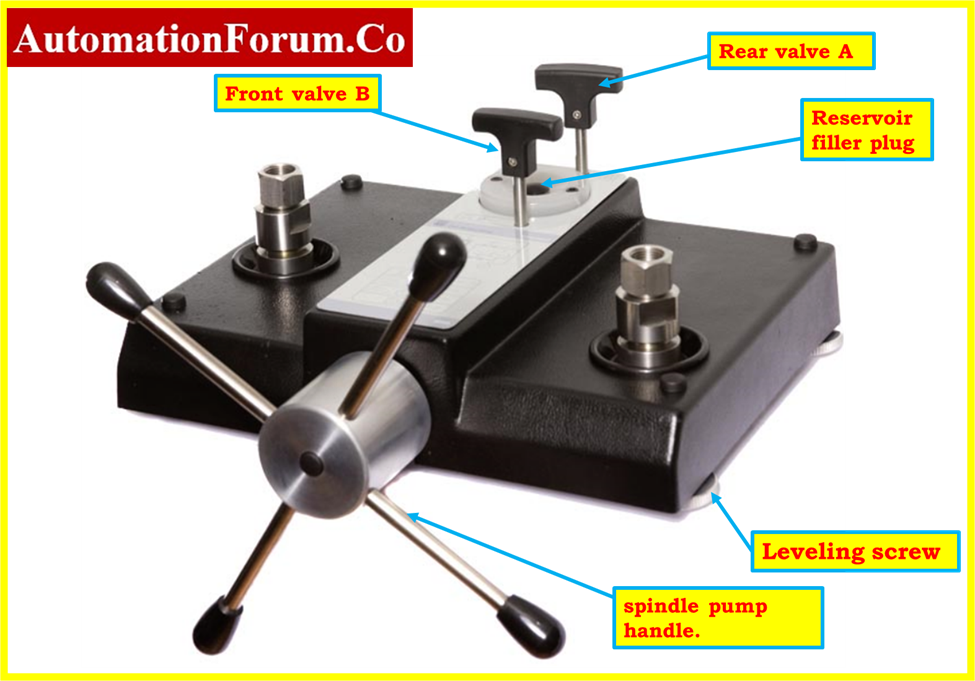
- The comparator base should be placed on a flat surface.
- Check the four hand pump wheels’ spokes in the comparator to see whether they are securely fastened.

- Use the provided spirit level to ensure the piston-cylinder system’s comparator system base is level.
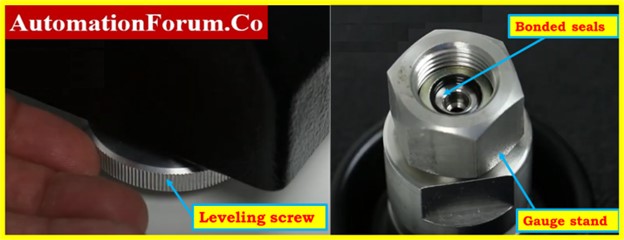
- Use the leveling screws to modify the slope as required.
- Use a bonded seal to secure the junction where the suitable connection is attached to the gauge stand, and then screw a test gauge (for installation, use a known gauge) into place.
- Try to pull the plug out of the reservoir to remove the filler plug. (This plug should be left out while the device is being used.)
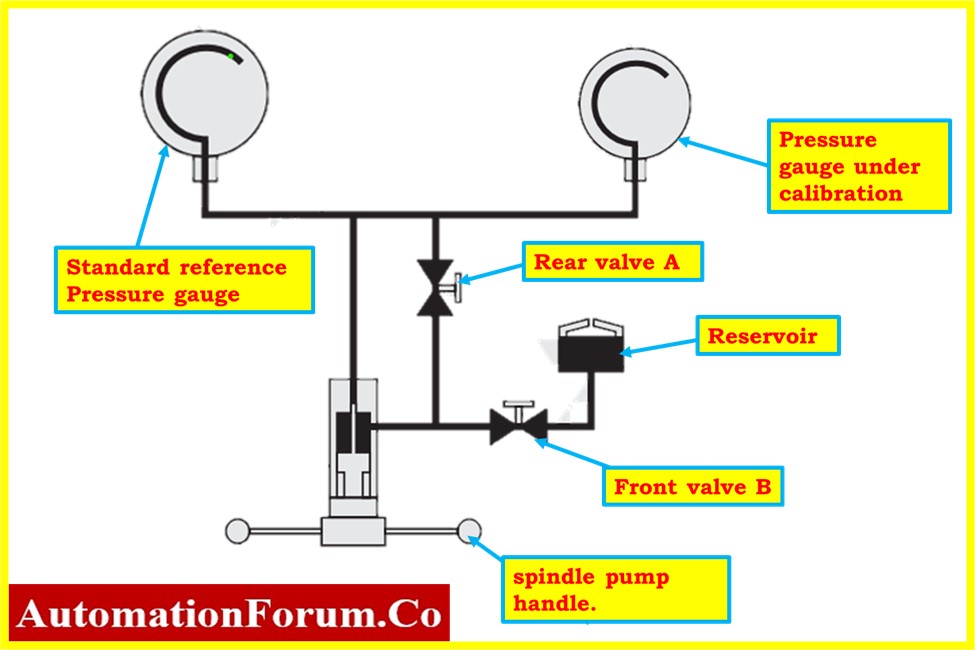
- Open both the A and B valves.
- The valve in the rear is called “Valve A,” and it is used to control the flow from the spindle pump’s ram with the bigger diameter. The front valve is called “Valve B,” and it controls how much liquid goes into and out of the reservoir.
- Completely clockwise turn the spindle pump handle.
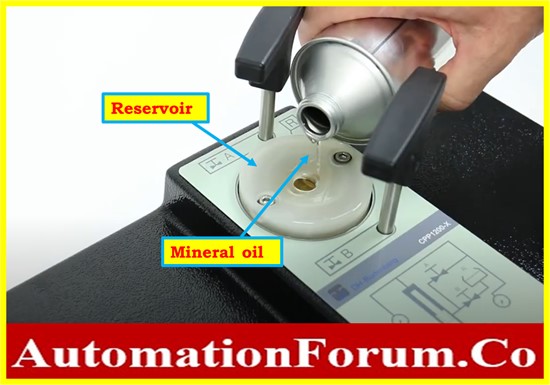
- Fill the tank with the correct liquid. Use the oil that came with the system or a substitute that has been approved. Do not use other liquids.
- Turn the pump’s handle all the way anticlockwise.
- If required, top out the reservoir.
- The calibration setup for the pressure gauge is now ready to be used.
Step 4 : Calibration of Pressure Gauge
- Use a clean, dry cloth to wipe the gauge to get rid of any loose dirt or debris. If required, use a cleaning solution that the manufacturer suggests. Do not use brushes or cleaning agents that might scratch the gauge face.
- Moreover, clean the pressure gauge’s Bourdon tube in accordance with the manufacturer’s instructions to prevent the mixing of process fluid and oil in the comparator.
- Look closely for any evidence of damage on the gauge, such as cracks or dents. Before calibrating, it may need to be fixed or replaced if you find any damage.
- To dry the gauge if it has any moisture, use a fresh, dry towel. Prior to calibration, make sure the gauge is totally dry.
- By utilizing the proper adapters and fittings, you may connect the pressure gauge to be calibrated and reference standard pressure gauge with oriented for viewing. Make sure the connections are secure and free of leaks.
- Close the Valve B and keep Valve A open.
- The comparator pump handle should be turned clockwise. By looking at both gauges, you can now see how the pressure will build within the comparator.
- Each calibration point is controlled by rotating the pump spindle.
- Use the reference standard to regulate the pressure when you apply a test pressure to the gauge. Record the measurements after allowing the gauge and reference standard to settle.
- Continue this procedure at several test pressure points on the calibrating gauge. Keep track of each pressure’s measurements.
- Determine the difference between the reading from the gauge and the reading from the reference standard for each pressure. Using any calibration adjustments on the gauge, adjust it as needed to reduce the inaccuracy.
- Remove the ring, window, gasket, and pointer to do adjustments.
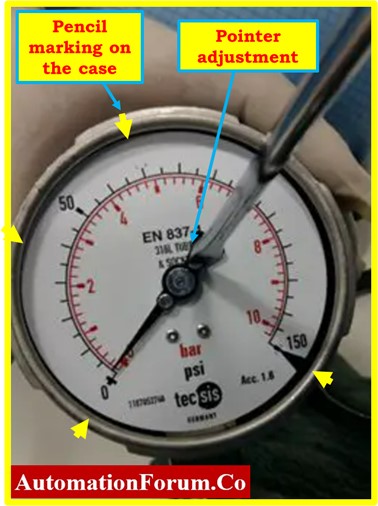
- According to the dial, mark the case flange at 0, 25, 50, 75%, and 100% of the pressure gauge’s range.
- Followed by that remove dial from the gauge
- Pointer should be gently pressed against the pinion and precisely aligned with the 0% mark on the case flange.
- Start by applying pressure, then do the calibration.
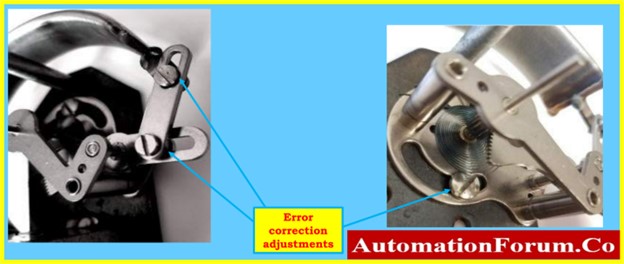
- Adjustments for zero, span, and linearity error varied depending on the manufacturer and type of the pressure gauge. To learn about the calibration process and adjustments, always read the pressure gauge manual.
- After making the necessary adjustments, remove the pointer away once again. Put in place the back dial, pointer and close the pressure gauge with case cover.
- Apply the test pressure once again and compare the results after making any necessary adjustments. Continue doing this until the gauge’s readings fall within a reasonable tolerance of the reference standard.
Step 5: Recording Calibration Results
- Do linearity tests in the upscale and downscale directions at 0%, 25%, 50%, 75% and 100% to make sure the pressure gauge is producing the correct numbers.
- If the output value does not fall within an acceptable range, calibration is required. Once again, if the displayed values have departed from the permitted range, a pressure gauge must be repaired or replaced.
- No extra calibration is required if every output value (+/- %) falls within acceptable bounds.
- The output data should be entered into the as found/as left column of the blank calibration report.
Accuracy Class & Tolerance Table
| Accuracy Class | Permissible Error (% of Full Scale) | Typical Application |
| Class 0.25 | ±0.25% | Laboratory, custody transfer |
| Class 0.5 | ±0.5% | Critical process measurement |
| Class 1.0 | ±1.0% | General industrial service |
| Class 2.5 | ±2.5% | Utilities and non-critical use |
Step 6: Completion of Calibration
- When the calibration has been successfully conducted, attach the calibration label to the pressure gauge.
- When the calibration is complete, clean the instrument, store it somewhere safe, and record the calibration data for later use.
- Disconnect the pressure gauge, comparator, and other setup.
- Reinstall the pressure gauge in the processing area.
- Make sure the workspace is tidy.
- De-isolate the equipment.
- Resume the pressure gauge and check that it is functioning correctly.
Step 7: Calibration Report Preparation
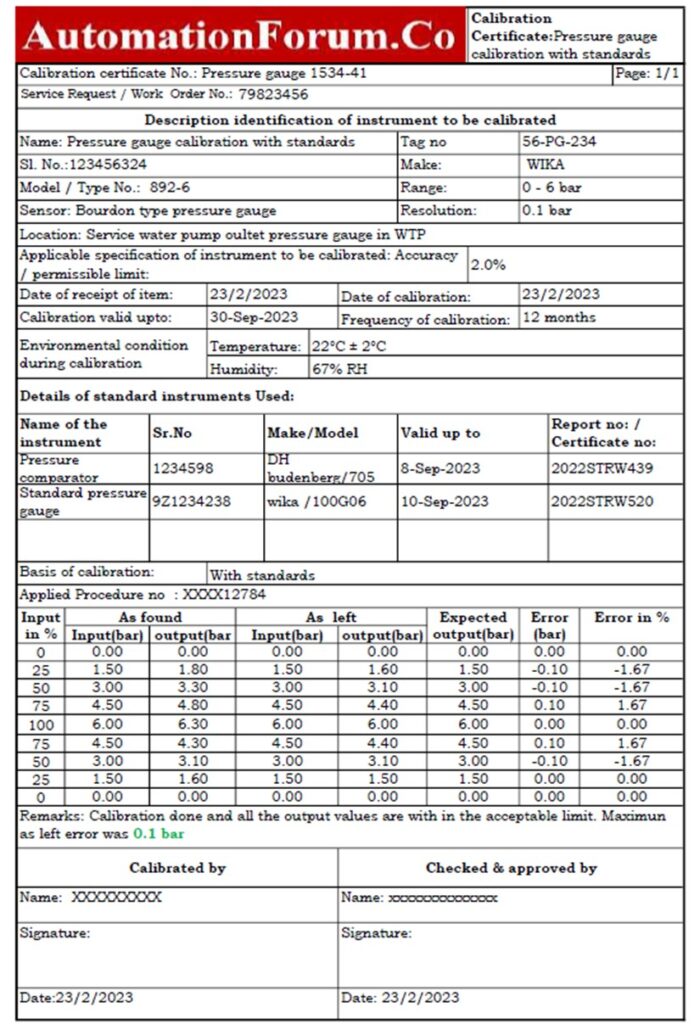
The next picture shows that the pressure gauge sample report of calibration was done in workshop with pressure comparator and standard pressure gauge as the reference.
The Excel template that was used to make the pressure gauge calibration report can be downloaded from the link below.
Traceability in Pressure Gauge Calibration
Traceability ensures that calibration results are linked to national or international standards through a series of comparisons with stated uncertainties. This guarantees that measurements from your pressure gauge are reliable and consistent with recognized references.
- Calibration Chain: The chain begins with a primary standard (e.g., NIST), followed by secondary standards and reference instruments used in the calibration process.
- Documentation: A clear calibration record showing the instrument’s calibration history, including reference standards and their calibration certificates, should be maintained to ensure full traceability.
Calibration Standards and Regulations
Pressure gauge calibration must follow specific standards to ensure accuracy and compliance. These include:
- ISO 9001: For quality management, ensuring that instruments meet industry requirements.
- ISO 17025: Specifically for calibration laboratories, focusing on technical competence and traceability.
- ASME B40.100: This standard provides guidelines on the design, use, and calibration of pressure gauges.
- NIST (National Institute of Standards and Technology): In the U.S., NIST standards are often the reference for traceable calibration.
- IEC 60529: Defines protection against solid objects and liquids, relevant for pressure gauges used in harsh environments.
Calibration Interval and Maintenance Guidelines
To maintain traceability and compliance, it’s crucial to establish a regular calibration schedule based on factors such as:
- Usage frequency: Gauges used continuously in harsh environments may need calibration more often.
- Environmental conditions: High humidity, temperature fluctuations, or corrosive environments can cause drift in gauge readings.
- Manufacturer recommendations: Typically, manufacturers will provide guidance on calibration intervals.
- Industry standards: Specific industries may have set standards on calibration intervals. For example, the food and beverage industry may require gauges to be calibrated annually.
Calibration Acceptance Criteria
A pressure gauge is considered acceptable when:
- No mechanical damage or pointer sticking is observed
- Errors are within specified accuracy class limits
- Repeatability and hysteresis are within tolerance
Common Pressure Gauge Calibration Mistakes
Ignoring temperature effects during calibration
- Trapped air bubbles in comparator oil
- Using a reference gauge with insufficient accuracy
- Skipping downscale (falling pressure) readings
- Not allowing pressure to stabilize before recording
FAQs on Pressure Gauge Calibration
Why is pressure gauge calibration important?
Calibration makes sure that everything is correct, safe, and in line with standards like ASME B40.100 and ISO 17025.
How often should a pressure gauge be calibrated?
Typically once a year, but more frequently in harsh conditions or critical applications.
What is the ASME standard for pressure gauge calibration?
The applicable ASME standard is ASME B40.100, which defines accuracy classes, tolerances, and calibration requirements for pressure gauges.
It is commonly used along with ISO/IEC 17025 for traceable laboratory calibration.
What are the 5 points of calibration?
The five calibration points are 0%, 25%, 50%, 75%, and 100% of full scale.
These points verify accuracy, linearity, and repeatability across the gauge’s range.
How to do pressure calibration?
Pressure calibration is done by comparing the gauge under test with a traceable reference standard using a comparator.
Pressure is applied stepwise, readings are compared, and adjustments are made if errors exceed tolerance.
What tools are required for pressure gauge calibration?
A reference digital gauge, a comparator, oil, a pointer remover, adapters, and templates for calibration reports.
What is traceability in pressure gauge calibration?
It entails connecting calibration results to national and international standards (like NIST) with a record of uncertainty.
Which industries require frequent pressure gauge calibration?
The oil and gas, power plants, food processing, pharmaceuticals, and chemical sectors.