- Step by Step Calibration Procedure for Thermocouple
- Step 1: Prepare the Tools Required for Thermocouple Calibration
- Step 2: Safety Precautions
- Step 3 : Understand the Calibration Principle
- Step 4 : Prepare Calibration Setup for Thermocouple
- Step 5 : Calibration of Thermocouple
- Step 6 : Recording Calibration with Linearity Check
- Step 7 : Completion of Calibration
- Step 8 : Calibration Report Preparation and Validation
- Regulations Standards for Calibration of Thermocouple
What is a Thermocouple?

A sensor that can monitor temperature is referred to as a thermocouple. It is made up of two distinct kinds of metals, each of which is connected to the other on one end. A voltage is produced at the junction of the two metals whenever either one of the metals is heated or cooled, this voltage may be directly connected to the temperature. The thermocouple is a kind of temperature sensor that is widely employed in a variety of temperature measuring procedures due to its ease of use, durability, and low cost.
How do you Calibrate a Thermocouple?
Step by Step Calibration Procedure for Thermocouple
This method contains directions for calibrating a thermocouple using a dry bath temperature calibrator and a thermometer. These instructions are included in the procedure.
What is required for Thermocouple Calibration?
Step 1: Prepare the Tools Required for Thermocouple Calibration

- Necessary hand tools.
- Multimeter.
- Dry bath temperature calibrator.
- Fluke digital thermometer.
- Soft cloth for cleaning.
- Thermocouple sockets, Test Probes & Leads
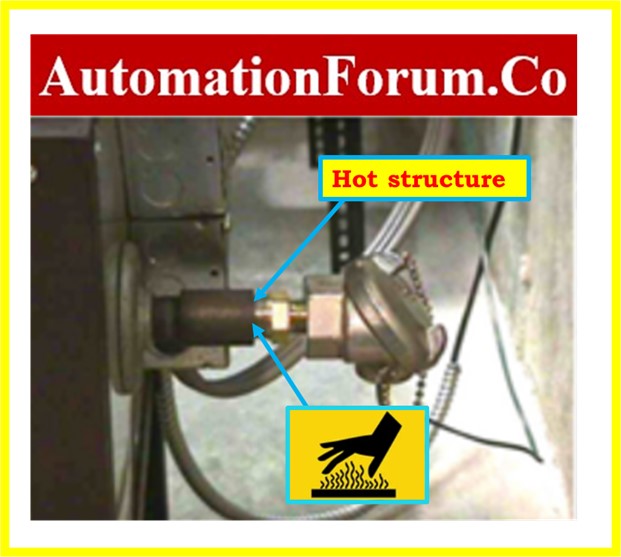
Step 2: Safety Precautions
- If you disconnect a thermocouple from the system to which it is linked, the thermocouple will no longer function properly and will no longer produce temperature measurements or activate the system
- This has the potential to cause issues or failures in a system in which the thermocouple is a crucial safety component that helps prevent damage or accidents from happening in the system
- For information on basic safety, general recommendations, and specifics on calibrating operations in process industries, please click on the link provided below. Basic Safety and General Consideration While Executing Calibration Process in process industries
- In the event that you need to disconnect a thermocouple for the purposes of maintenance or repair, be sure to follow the appropriate procedures and take the necessary measures to prevent any accidents or damage to the system. If you fail to do so, you could cause serious injury to yourself or to others.
- Request that the panel operator select the ESD loop’s MOS and the control loop’s manual mode.
- Isolate the power to the process equipment : Be sure that all power to the apparatus or process is shut off before trying to remove the thermocouple.
- If the process being monitored is running at a high temperature, give it some time to cool down before trying to remove the thermocouple. This will reduce the risk of burns or thermocouple damage.
- Remove any attachments: Carefully remove any bolts, clamps, or other fasteners that may be keeping the thermocouple in place if it is connected to a fitting or other component.
- Remove any attachments: Carefully remove any bolts, clamps, or other fasteners that may be keeping the thermocouple in place if it is connected to a fitting or other component.
- Disconnect the wires: After releasing the thermocouple from any fasteners, remove the wires that link it to the measuring instrument. Avoid damaging the connections or any of the wires.
- Ensure that the thermocouple is entirely isolated from the operation.
- While working in a process area, use the appropriate PPE, such as gloves, safety glasses, and a face mask, to protect yourself from dangerous chemicals and to comply with safety regulations.
- The thermocouple signal cable should be isolated from any neighboring junction boxes or marshalling panels close to the control room.
- And be sure to receive instructions on how to properly remove the thermocouple from the apparatus from either the equipment’s manual or a qualified technician.
- Thermocouple storage should be done correctly. When the thermocouple has been taken out, it should be kept in a secure area away from harsh elements.
Step 3 : Understand the Calibration Principle
What is Dry Bath Calibration?
Dry-blocks are tools that are used to calibrate and validate temperatures. They provide a stable and uniform environment for heating or cooling temperature sensors, like thermocouples or RTDs, to known and precise temperatures. This makes it possible to calibrate and test instruments that measure temperature.
Most Important Factors to Consider for Selecting Dry-Bath Calibrator
Temperature Range:
The dry-temperature bath’s range should be right for the temperature range your application needs. Some dry-baths let you control the temperature over a wider range than others, so make sure you have one that can handle the temperature range you need.
Stability and Uniformity:
When comparing dry-bath products, stability and uniformity are important things to think about. A high-quality dry-bath should provide a stable and uniform environment for temperature calibration, making sure that the temperature stays the same throughout the bath.
Heating and Cooling Time:
When choosing a dry-bath, it’s important to think about how long it takes to heat up and cool down. Some products may take longer to heat up or cool down than others, which can make the calibration process less effective.
Portability and Ease of Use:
Two other important things to think about when choosing a dry-bath product are portability and ease of use. Some dry-baths may be easier to move around or have features that make them easier to use than others. This can affect how they can be used and where they can be used.
Accuracy:
A good dry- bath should let you control and measure temperature accurately, so you can calibrate and test temperature sensors with precision. It’s important to remember that the accuracy of the calibration depends on the accuracy of the reference thermometer and the dry bath calibrator. To get the most accurate results, it’s best to use instruments that have been checked and certified by a reliable third-party calibration service.
Step 4 : Prepare Calibration Setup for Thermocouple

- Gather the necessary tools: a dry bath calibrator, suitable size thermowell for thermocouple, a thermometer with the right range and accuracy, a power source, a thermocouple, and any extra compensating cables or probes and connectors needed to connect the thermocouple to the calibrator and thermometer.
- Ensure that the equipment is clean and devoid of any dirt or residue that might impact the calibration’s precision.
- Connect the dry bath calibrator to the power source and turn it on. Check to see if the device is working right and if the temperature control is set to the right range.
- Make sure the sensing element is completely submerged in the bath and not contacting the walls or bottom of the container as you insert the thermocouple into the dry bath calibrator with the appropriate thermowell.

- Using the proper connection or cable, attach the thermocouple to the indicator input of dry bath calibrator. Check that the thermocouple and connector are in good shape and that the connection is secure.
- In the same place where the thermocouple is inserted, use the standard reference thermometer to measure the temperature of the dry bath calibrator. Inspect the thermometer to make sure it has been calibrated and has the correct accuracy and resolution for the calibration.
- Compare the thermometer’s reading to the temperature that the dry bath calibrator has shown. If there is a discrepancy, adjust the dry bath calibrator’s temperature appropriately and wait until it has stabilized before taking another reading with the thermometer.
- When the thermometer and dry bath calibrator are stable and the temperatures match, the setup is ready for calibration.
Step 5 : Calibration of Thermocouple
- Set the dry bath temperature calibrator according to the kind of thermocouple that will be calibrated. Based on the type of the thermocouple, adjust the set temperature in the dry bath calibrator as necessary.
- Never exceed the thermocouple’s temperature range; always read the manual to identify the exact range.
- Provide enough time, usually several minutes, for the thermocouple and dry bath calibrator to stabilize at the same temperature
- Keep track of the thermocouple’s output signal and the dry bath calibrator’s measurement of the reference temperature.
- To calibrate the thermocouple, repeat the procedure for a number of different reference temperatures that range from low to high.
- The calibration process may be different depending on the specific calibrator, so please read the manufacturer’s instructions before beginning.
Step 6 : Recording Calibration with Linearity Check
- Apply inputs from the test calibrators in the upscale and downscale temperature directions that correspond to the thermocouple output values.
- If the output value does not fall within an acceptable range, re-calibration is required. Once again, if the output values go outside of the allowed range, a new thermocouple must be installed.
- No further calibration is required if every output value (+/- %) falls within accepted limits.
- The output values should be entered in the as found/as left column of the blank calibration report.
Step 7 : Completion of Calibration
- Place the calibration label on the thermocouple after the calibration has been successfully completed.
- When the calibration is finished, clean the equipment, place it in a secure area, and record the calibration information for future use.
- Disconnect the calibrators.
- Fix back the thermocouple in the processing area.
- Ensure that the workplace is clean.
- De-isolate the equipment.
- Restore the bypassed or inhibited signal to its normal level.
- Put the thermocouple back into service and make sure it is functioning properly.
Step 8 : Calibration Report Preparation and Validation
The next picture shows that the thermocouple sample report of calibration was done using a dry bath temperature calibrator and thermometer, with a standard thermocouple as the reference.

The Excel template that was used to make the thermocouple calibration report can be downloaded from the link below.
Regulations Standards for Calibration of Thermocouple
Our thermocouple calibration procedure adheres closely to established standards, including those set forth by ASTM International and the National Institute of Standards and Technology (NIST), ensuring our processes meet rigorous criteria for accuracy and traceability
In addition, we insist on reviewing the manufacturer’s information for model-specific instructions and recommendations, which improves accuracy and reliability in our calibration process.
These organizations provide guidelines and standards for calibration procedures, ensuring accuracy and traceability in measurement processes. Be sure to check the specific standards applicable to your region and industry to ensure compliance with regulatory requirements.
Click here for more Calibration Procedure