Introduction
A computer-on-chip is a microcontroller. It is a microprocessor, memory, I/O port, and occasionally an A/D converter integrated circuit. Multiple programming languages, including Assembly and C/C++, can be used to create it. It can be utilized in production lines, although more gear is needed. The majority of technical goods that use microcontrollers are air conditioners and washing machines.
In this article we will discuss about Arduino UNO for constructing the projects.
A platform with open-source hardware and software for creating electronics projects
A piece of software, or IDE (Integrated Development Environment), that runs on your computer and is used to write and upload computer code to the physical board (supports Mac/Windows/Linux).
A physical programmable circuit board (commonly referred to as a microcontroller).
Different Types Of Arduino Board
There are many types available on the market. Based on the requirement of the user and application every board will be chosen. Some few types of Arduino and corresponding features are listed below
| S. NO | ARDUINO BOARD | FEATURES |
| 1 | Arduino Uno (R3)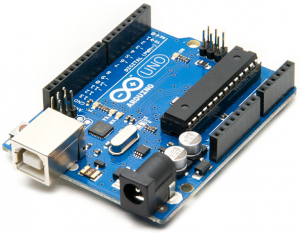 | The Arduino UNO is a microcontroller board with an ATmega328P processor. It contains 6 analogue inputs, a 16 MHz ceramic resonator, a USB port, a power jack, an ICSP header, and a reset button. It also has 14 digital input/output pins, six of which can be used as PWM outputs.SRAM is 2 KB, EEPROM is 1 KB, and Flash Memory is 32 KB. |
| 2 | Arduino Nano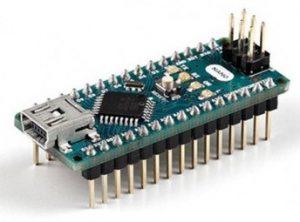 | The 8-bit AVR family includes the microcontroller ATmega328P.Output / Input are 22 pins total, 6 analogue I/p pins (A0 to A5), 14 digital pins, and 22 total.EEPROM size is 1 KB, SRAM size is 2 KB, and the clock speed is 16 MHz for flash memory.enables three communications, including SPI, IIC, and USART |
| 3 | Arduino Micro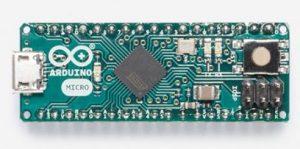 | The ATmega32u4 microcontroller has seven PWM channels and digital I/O pins. 12 analogue channels and 20 digital I/O• Flash Memory 32 KB (ATmega32u4), of which the bootloader uses 4 KB; • EEPROM 1 KB and SRAM 2.5 KB.• 16 MHz Clock Speed |
| 4 | Arduino Due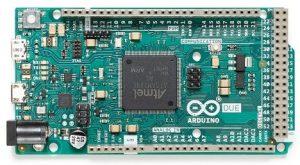 | The Atmel SAM3X8E ARM Cortex-M3 CPU is the foundation of the microcontroller board known as the Arduino Due. It has four hardware serial ports (UARTs), an 84 MHz clock, 12 analogue inputs, 54 digital input/output pins, 12 of which can be utilized as PWM outputs, and USB OTG connectivity.2 DAC (digital to analogue) connectors, 2 TWI connectors, an SPI header, a JTAG header, a reset button, and an erase button. |
| 5 | LilyPad Arduino Board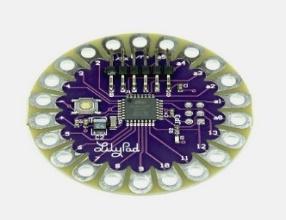 | 9 input/output pins altogether.5 digital input and output pins Reset button 4 Analogue input output pinsIt has an integrated JST connector (built-in power supply socket) for a 3.7 V LiPo battery It makes use of an ATmega328. |
| 6 | Arduino Diecimila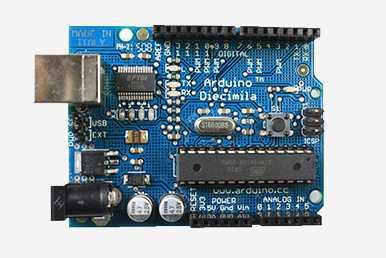 | Based on the ATmega168, the Arduino Diecimila is a microcontroller board. It has a USB port, a power jack, an ICSP header, 6 analogue inputs, a 16 MHz crystal oscillator, and a reset button.It also has 14 digital input/output pins, 6 of which can be used as PWM outputs. |
| 7 | RedBoard Arduino Board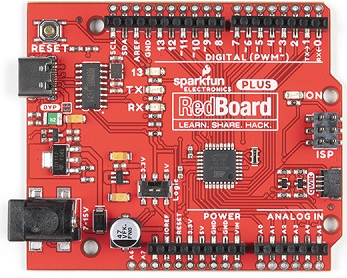 | The popular ATmega328 microcontroller has 14 digital I/O pins, an Optiboot (UNO) bootloader, and 6 PWM outputs. 6 Analog InputsFlash Memory 32 kCompatible with 16MHz Clock Speed R3 Shield |
| 8 | Arduino Mega (R3) Board | Using the ATmega2560 as its basis, the Arduino Mega 2560 is a microcontroller board. It contains 16 analogue inputs, 4 UARTs (hardware serial ports), a 16 MHz crystal oscillator, 54 digital input/output pins (of which 15 can be used as PWM outputs), ICSP header, power jack, USB connector, and reset button. |
| 9 | Arduino Leonardo Board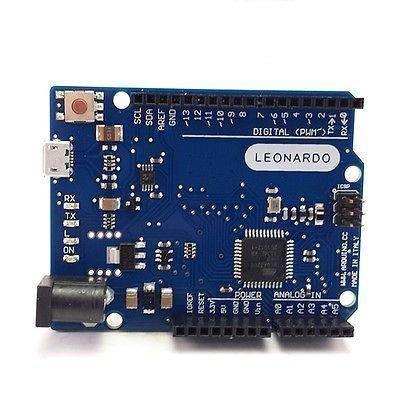 | Based on the ATmega32u4, the Arduino Leonardo is a microcontroller board. It contains a 16 MHz crystal oscillator, a micro-USB port, a power jack, an ICSP header, and a reset button.Additionally, it includes 20 digital input/output pins, of which 12 are analogue inputs and 7 are PWM outputs. |
| 10 | Arduino Esplora | A microcontroller, a tiny computer, and a number of inputs and outputs are features of the Arduino Esplora device. Four buttons, a slider, a microphone, a temperature sensor, an accelerometer, a joystick, and other input devices are included. There is a buzzer and a three-color LED as outputs. |
| 11 | Arduino Zero![Arduino Zero [ABX00003]](https://lh4.googleusercontent.com/fmHg6X_9Q9mUPhtRGc-WwpT_3JOwwPwpCnd0RgYWF-RtDpQ0w89VHk9-LZ7d0V7AyEHGhRudkqhKaE4aTtCd2TeGlbMRuf6kWhtwVMbnDDr-KlgfFDFJVK6Gc-PXbnZNwUyC30njnQXklUwJKwgznA) | The board is powered by the 32-bit ARM Cortex® M0+ core SAMD21 MCU from Atmel. Atmel’s Embedded Debugger (EDBG), which offers a comprehensive debug interface without the need for additional hardware.A virtual COM port that can be used for device and bootloader programming is supported by EDBG as well.Microcontroller with 20 digital I/O pins and an ARM Cortex M0+ of 32 bits with 10 PWM pins6 analogue input pins, 2 UART, one12-bit ADC channels,1 pin for analogue output, 10-bit DAC48 MHz clock speed, 256 KB flash memory, 32 KB SRAM, and no EEPROM. |
Various Arduino Shields Used By Arduino Boards
A number of Arduino boards can also be connected to one another using shields, which are pre-built circuit boards. These shields attach to the top of Arduino-compatible boards and add extra features like internet access, motor control, wireless connection, LCD screen control, etc. Shields are the various sorts of Arduino shields.
| DIFFERENT TYPES OF ARDUINO SHIELD | |||
| Ethernet Shield | CAN-BUS shield | Joystick Shield Kit | MP3 Player Shield |
| Relay Shield | Smoke Detector Shield | GSM/GPRS Shield | Camera Shield |
| ProtoShield | Negative Voltage Generation Shield | Gameduino Shield | GPS Logger Shield |
| Motor Shield | Wave Shield | microSD Shield | Wireless SD Shield |
| LCD Shield | CISECO ProtoX Shield | NFC/RFID Shield | cc300 Wi-Fi Shield |
| Capacitive Touchpad Shield | 64-Button Shield | Adafruit NeoPixel Shield | ESP8266 Wi-Fi Shield |
| HC-05 Bluetooth Shield | |||
Selection Of Right Arduino Board
Today’s market offers a variety of Arduino boards, including the FreeDuino and NetDuino. Based on the specified application, choosing an Arduino board is the best option. Every board may be programmed using the Arduino IDE software, which enables anyone to create and upload code, however each board differs in terms of inputs, outputs, speed, form factor, voltage, etc. These boards require voltages between 3.7 and 5 volts to function. The features listed above provide guidance on selecting the ideal Arduino for the relevant applications.
Creating A Project (Reading The Status Of Button) Using Arduino Uno
In this article Arduino UNO Board is used. Below content will help users to create a basic project with Arduino Board and Arduino Compiler.

- ARDUINO UNO BOARD
Arduino software or Arduino IDE can download from the official website.https://www.arduino.cc/en/software. Two procedures exist for installing IDE. One is through an automatic installer that is a.exe file, and the other is through zip files. We advise using the installer to set up the Arduino IDE because it will set up all the necessary drivers for it to function. You must manually install everything in zip files. Please permit automatic driver installation after the download and grant administrator access if necessary.
Once the software installed, please follow the following procedure for any project.
- Connect your Arduino with a USB cord to your PC.
- The USB type B 2.0 connector on the USB cable’s other end connects to your Arduino, while the USB type A 2.0 connector attaches to a USB port on your computer.
- To locate your Arduino board, select Tools -> Board->Arduino Uno from the menu.
- This menu contains all of the Arduino boards, including the Arduino MEGA 2560 and Arduino Leonardo.
- For your USB cable, choose the appropriate serial port.
- Go to Tools->Serial Port->com port to quickly locate the serial port.
- The COM port on a Windows PC will typically be the greatest number, such as com 3 or com 15 etc., if your Arduino has just been connected. Your next com port for that device will be higher if you are using several devices to connect to your computer.
- Select “Upload” from the menu.
- The upper left corner is where you’ll find this button. The keyboard shortcuts Ctrl+U for Windows and Cmd+U for
- SCHEMATIC OF SWITCH WITH LED
The below Schematic show the Switch the LED using Arduino Uno. It Consists of Arduino Uno, LED, Push Switch and resistance for constructing the circuit. The explanation of program and circuit is given below.

- CODE FOR SWITCH WITH LED
int ledPin = 9;
void setup()
{
pinMode(ledPin, OUTPUT);
}
void loop()
{
digitalWrite(ledPin,HIGH);
else
digitalWrite(ledPin, LOW);
}
- PROCEDURE FOR DOWNLOADING THE PROGRAM THROUGH ARDUINO IDE TO ARDUINO UNO BOARD
- The below screen shot shows how to run the Arduino Programming(Connect the Arduino Uno board to the Laptop/Computer through the USB Cable)

- Once the Arduino IDE is opened. Go to tools under tools select the board which is connected to the Laptop/Computer

- Once the board selected. Now select the com port in which the board plugged in.

- After the board and com port selected. Create the necessary Arduino program.(Here Switch the LED) and compile


- Now press the Upload button, the program will be uploaded in the Arduino board.


- Once program is uploaded the output can checked in the real circuit
- CIRCUIT EXPLANATION
The objective of the project is to get the status of the switch input and send the status to LED as output. The Arduino UNO have 14 digital I/O’s. In this project we use pin number 3 as Input and pin number 5 as Output.
INPUT CONNECTION

OUTPUT CONNECTION
The below circuit is used as the output connection of Arduino. The resistance used is act as limiting resistance for the LED.

- CODE EXPLANATION
- The first section consists of declaration of various Input and Outputs. Here the buttonPin is variable declared as input for pin number 7. Similarly, ledPin is declared as Output for pin number 9

- The void setup() is the main function of any Arduino programming. In this section the declared variable is defined to Arduino which pin will be output and which will be input. The pinMode() decides the direction either input or output.

- In this section the main program or objective of the program defined. Since the objective of the program is read the status of the switch. If the switch is pressed the LED ON(Output is High), otherwise the LED OFF(Output is Low).
- The button is another variable declared for the predefined function digitalRead(buttonPin). The digitalRead is inbuild function of Arduino used to read the digital input to the Arduino which is declared inside the brackets().
- Similarly, digitalWrite(ledPin, High) is the predefined function of Arduino used to write the data outside the Arduino. Here digitalWrite() tell the action of output whether the output is High or Low.

NOTE: THE ABOVE PROGRAM IS BASIC FOR ALL TYPES OF DIGITAL TYPE SENSOR INTERFACE PROGRAM. IN PLACE OF SWITCH THE DIGITAL SENSOR CAN BE REPLACED
After the successful completion of the above procedure, the user will be able to construct the circuit and write the program for “SWITCHING THE LED THROUGH ARDUINO”